Another sewing post. How predictable of me! So this covers the ever elusive "can I wash it" question we all ask about our home sewn garments. The answer is, did you wash the fabric before you sewed?
The answer to that question makes a huge difference in whether or not you can wash the finished garment. Fabric sold off the bolt isn't like fabric sold as a shirt or a skirt or a towel. It comes pretty much straight from the mill as is. So, if it is a bright color or a cotton, you can imagine what could happen! Also, there are sometimes waxes, chemicals, or other things in the fabric either naturally occurring in the fibers or that are used during manufacture. Also, it has not been pre shrunk. This is really the biggie. Fabrics can shrink more in one direction than the other leaving you with a warped garment. Needless to say, this is bad.
Of course there are other considerations to make as well. Does the fabric pill, shed, fray, or do something else totally undesirable in the wash? (Note: you can find out whether it exhibits this undesirable behavior before you put in the effort of making something awesome if you wash the fabric first.) You may want to think twice before washing it if the fabric is very delicate or proned to fraying. If you bind the edges with a serger or if you enclose them in a french seam, that can help, but it may not keep very frazzled fabrics in check forever. Delicate fabrics may handle hand washing, but just like certain bras and panties, etc in our lives, some stuff just doesn't go in the wash. Period! Also, some fabric types should never be washed, like leather. Some can be washed but with care, and not dried in a dryer, such as wool blends or cotton if you are worried about shrinkage.
Another thing to think about is thread choice. If you are sewing on silk, use silk thread, not cotton. You want the thread to behave the same way as the fabric will during washings and other treatments (for example if you want to dye the item later).
Another note: The care instructions on the bolt are helpful, but even more so is the fiber content. Sometimes, as with ready to wear garments, the manufacturers err on the side of caution and say you cannot wash something totally washable. My favorite example is polyester satin. It is TOTALLY washable and I have done so many times. But if you told someone that their fancy evening dress was washable, they would look at you funny. I even machine washed a wedding dress once. Came out JUST FINE!!! So, instead of trusting the label, trust your knowledge of how fibers behave. A quick google search can do wonders if you are unsure.
Generally speaking, machine sewing a garment makes it sturdy enough to withstand the washer, so most handmade stuff will fare just fine. The stitching will usually hold up great (although with extended wear it will need repairs just as any ready to wear clothes would), assuming you don't use a super long stitch length! :-)
Bottom line: If you prewash/dry all your fabric as you plan to treat the finished garment, you should be okay. If you are using something with a dark pigment, a fabric you worry will shrink, or something with a strong chemical smell or feel to it, feel free to wash it twice. It will only protect your final product!
Monday, August 29, 2011
Thursday, August 25, 2011
Making lasagna
So, I totally wimped out and purchased my fettuccine noodles for the other night. Determined not to be too afraid to try something new, I decided to use my pasta maker for lasagna noodles instead. A coworker of hubby's had a family emergency, so I decided to make them a lasagna to make things a little easier. Thus began the all day affair in my kitchen making zucchini bread and lasagna...
To start things off, I read the instruction manual for my new pasta machine. Wow... That was interesting. It seems like it was written in Chinese and then badly translated to English... So useless. For one thing there is no illustration for how to clamp it to a tabletop... So, through trial and error, I figured out how to work with the machine. Then I used the included recipe for pasta dough. Hurdle #2. There was WAY too much flour to incorporate so eventually I gave up. I kneaded it by hand way longer than the 2-3 minutes it recommended. I added more flour to keep it from being sticky when I ran it through the machine to work it to a soft consistency, but it still didn't amount to the quantity in the recipe. Then I began to thin the pasta sheets. The instructions didn't have a guideline for lasagna noodles, so I guessed and made them pretty thin, the second smallest setting. I think next time I will make them 1 thicker, but I am not sure it will be a hugely noticeable difference. Then I cut them to a good length and boiled those puppies! There were no cook times in the instructions, either, so I cooked them for about 4 minutes or so - I basically just cooked them until they looked right. Other than looking pale compared to store bought noodles, they were pretty much indistinguishable. They tasted good! Success! So I made my lasagna :-)
Jenni's Lasagna:
Noodles:
about 1 1/2 C all purpose flour plus more for dusting
3 eggs
in a bowl or on a floured worktop, create a well in the middle of the flour and crack in the eggs. With a fork, incorporate the flour slowly into the egg without breaking the side of the well until the egg is no longer wet and runny. continue to work the dough until it is less sticky, then knead in the flour by hand until well incorporated and the dough is not sticky when pulled apart. Let the dough rest for 20 minutes.
Roll the dough out with a rolling pin into a narrow strip that will fit through the machine. Run the dough through the widest setting. Dust the rectangle with flour and then fold the strip in thirds. Repeat 9 times or until the dough is very silky, dusting the dough each time and the machine as needed. Dial the machine down size by size, cutting the length in half when it becomes too long to deal with and working each half separately, until the desired thickness is achieved. Dust the sheets with flour and then cut them to the desired length for your pan. I also cut some in half long ways (after I boiled them) because about one and a half sheets fit the width of my pan, but overlap is good too :-) If using fresh spinach, drain the pasta water over the spinach to wilt it.
Rest of Lasagna:
1 lb ground beef or italian sausage
1 medium onion
1T or so italian spice
2 cloves garlic or ~1t garlic powder
1Lb frozen or fresh spinach
1 egg
1.5 oz or so freshly grated Parmesan
16 oz ricotta (the smaller container in the store)
1t parsley
8 oz mozzarella, grated
1 can Hunts Four cheese tomato sauce
Preheat oven to 350. Brown meat and onion in med skillet over med hi heat; drain fat. Add spices and cook until flavors meld, 2-3 mins. Layer noodles in bottom of pan and spread the meat over the noodles. Add 1/2 can of sauce over the meat and spread it evenly. Add another layer of noodles. Microwave the spinach until it is no longer frozen, or if using fresh, pour the hot noodle water over them to wilt it. If you forgot this step, no biggie, just put it in raw. It will wilt in the oven just fine, but the layer will be a bit bulkier. Add another layer of noodles. In a medium bowl, combine the ricotta, egg, parsley, and a little of the Parmesan (the rest will go on top of the lasagna so use your judgement). Mix thoroughly and spread the mixture over the noodles. Add another layer of noodles, spread the remaining sauce over the noodles and top with the mozzarella and the rest of the Parmesan. Bake for 35-45 minutes or until the sauce is bubbling and the cheese on top is browning and bubbly. Enjoy!
Monday, August 22, 2011
No time to Blog...
Edited 8/23: Added 2 photos hooray!
So ren faire was this weekend. Whoa. I was sooo busy I didn't even have time to write about how busy I was. But everything (almost) got done. I decided not to make a vest for my nephew as he is sensitive to heat and probably wouldn't want to wear it anyway. I also forgot to make him a sash and when I remembered it was too late; I didn't have the right color fabric anyway. I didn't make hubby a new pair of pants as his old ones worked fine still. I also didn't get around to making myself anything to wear. Oh well. But everything else turned out fabulously. All in all, I made 3 shirts from 3 different patterns, a vest of my own design, a pair of shorts of my own design, a very difficult pair of breeches, and my hubby's infamous doublet. I was up till 12:30 on Friday night/Saturday morning sewing on buttons and up at 6:30 Saturday to make the buttonholes via the sewing machine and to pound a few last minute eyelets and thread some ribbons through casings, but all in all, it wasn't as last minute as I have been in the past! I wasn't hemming all the way to the state line! :-) I consider that a major victory.
As for photos. Well.... I kind of forgot my camera. I only have 1 costume here, and that is hubby's. I do have a friend who has photos of his outfit, but nothing of my nephew's. So I will post them when I get them. Sigh. All that work and no proof! Seems like that is always how it works out.
Tonight I am trying my hand at homemade pasta. I have long made fettuccine alfredo SAUCE from scratch (insanely fast and easy, btw) but I haven't tried the pasta part till now - weddings get you all kinds of kitchen gizmos you want but can't bring yourself to buy for your own kitchen. Hopefully I will not develop carpal tunnel from kneading dough. I hear it is a bear. :-)
So ren faire was this weekend. Whoa. I was sooo busy I didn't even have time to write about how busy I was. But everything (almost) got done. I decided not to make a vest for my nephew as he is sensitive to heat and probably wouldn't want to wear it anyway. I also forgot to make him a sash and when I remembered it was too late; I didn't have the right color fabric anyway. I didn't make hubby a new pair of pants as his old ones worked fine still. I also didn't get around to making myself anything to wear. Oh well. But everything else turned out fabulously. All in all, I made 3 shirts from 3 different patterns, a vest of my own design, a pair of shorts of my own design, a very difficult pair of breeches, and my hubby's infamous doublet. I was up till 12:30 on Friday night/Saturday morning sewing on buttons and up at 6:30 Saturday to make the buttonholes via the sewing machine and to pound a few last minute eyelets and thread some ribbons through casings, but all in all, it wasn't as last minute as I have been in the past! I wasn't hemming all the way to the state line! :-) I consider that a major victory.
As for photos. Well.... I kind of forgot my camera. I only have 1 costume here, and that is hubby's. I do have a friend who has photos of his outfit, but nothing of my nephew's. So I will post them when I get them. Sigh. All that work and no proof! Seems like that is always how it works out.
 |
| Hubby is on the far left (looking rumpled at the end of the day) and Warrior man is middle right. Didn't make the other 2. |
 |
| Better shot of warrior man... playing up the camera as always! |
Tonight I am trying my hand at homemade pasta. I have long made fettuccine alfredo SAUCE from scratch (insanely fast and easy, btw) but I haven't tried the pasta part till now - weddings get you all kinds of kitchen gizmos you want but can't bring yourself to buy for your own kitchen. Hopefully I will not develop carpal tunnel from kneading dough. I hear it is a bear. :-)
Tuesday, August 16, 2011
The Fauxby Wrap
Holy Crap! I actually finished something! What a great way to start a blog post!
So not everything you read on the internet is correct. Gasp. That or I am just an idiot. I posted a while ago that I got 2yd cuts of fabric for baby wraps. Well, when I went to try them out (before I cut thankfully), I discovered that they were WAY too short to successfully wrap around an adult body. Dismayed, I realized it really was 5-6 yards, not feet. The expense of the items just skyrocketed, but it was still better than buying retail. So, I went to hancock fabrics during a 50% off sale on gauze solids, and got myself some nice loose woven fabric.
How to make the "Fauxby" (Moby) Wrap:
(I apologize in advance for he lack of photos... My camera took a ton of really crappy ones that you can't see because of too much flash or too dark. I can't win...)
Cut 6 yards of fabric in half long ways (hot dog style for those that remember that) for a 45" wide fabric, in thirds for a 60" wide. This should give you either 2 or 3 long strips of fabric that are about 20" in width and 6 yards long. Take 1 long strip. This will be your wrap. Using a serger, finish all 4 edges. If you do not have a serger, use your sewing machine to make a narrow hem to finish all the edges. (To make a narrow hem: press under about 1/4" of fabric on each end. With the pressed edge facing down, press under 1/4" again from the pressed edge. The raw edge should now be enclosed by fabric. Machine stitch the top to keep the raw edge enclosed.) Your Fauxby wrap is now usable.
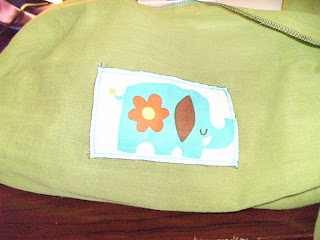
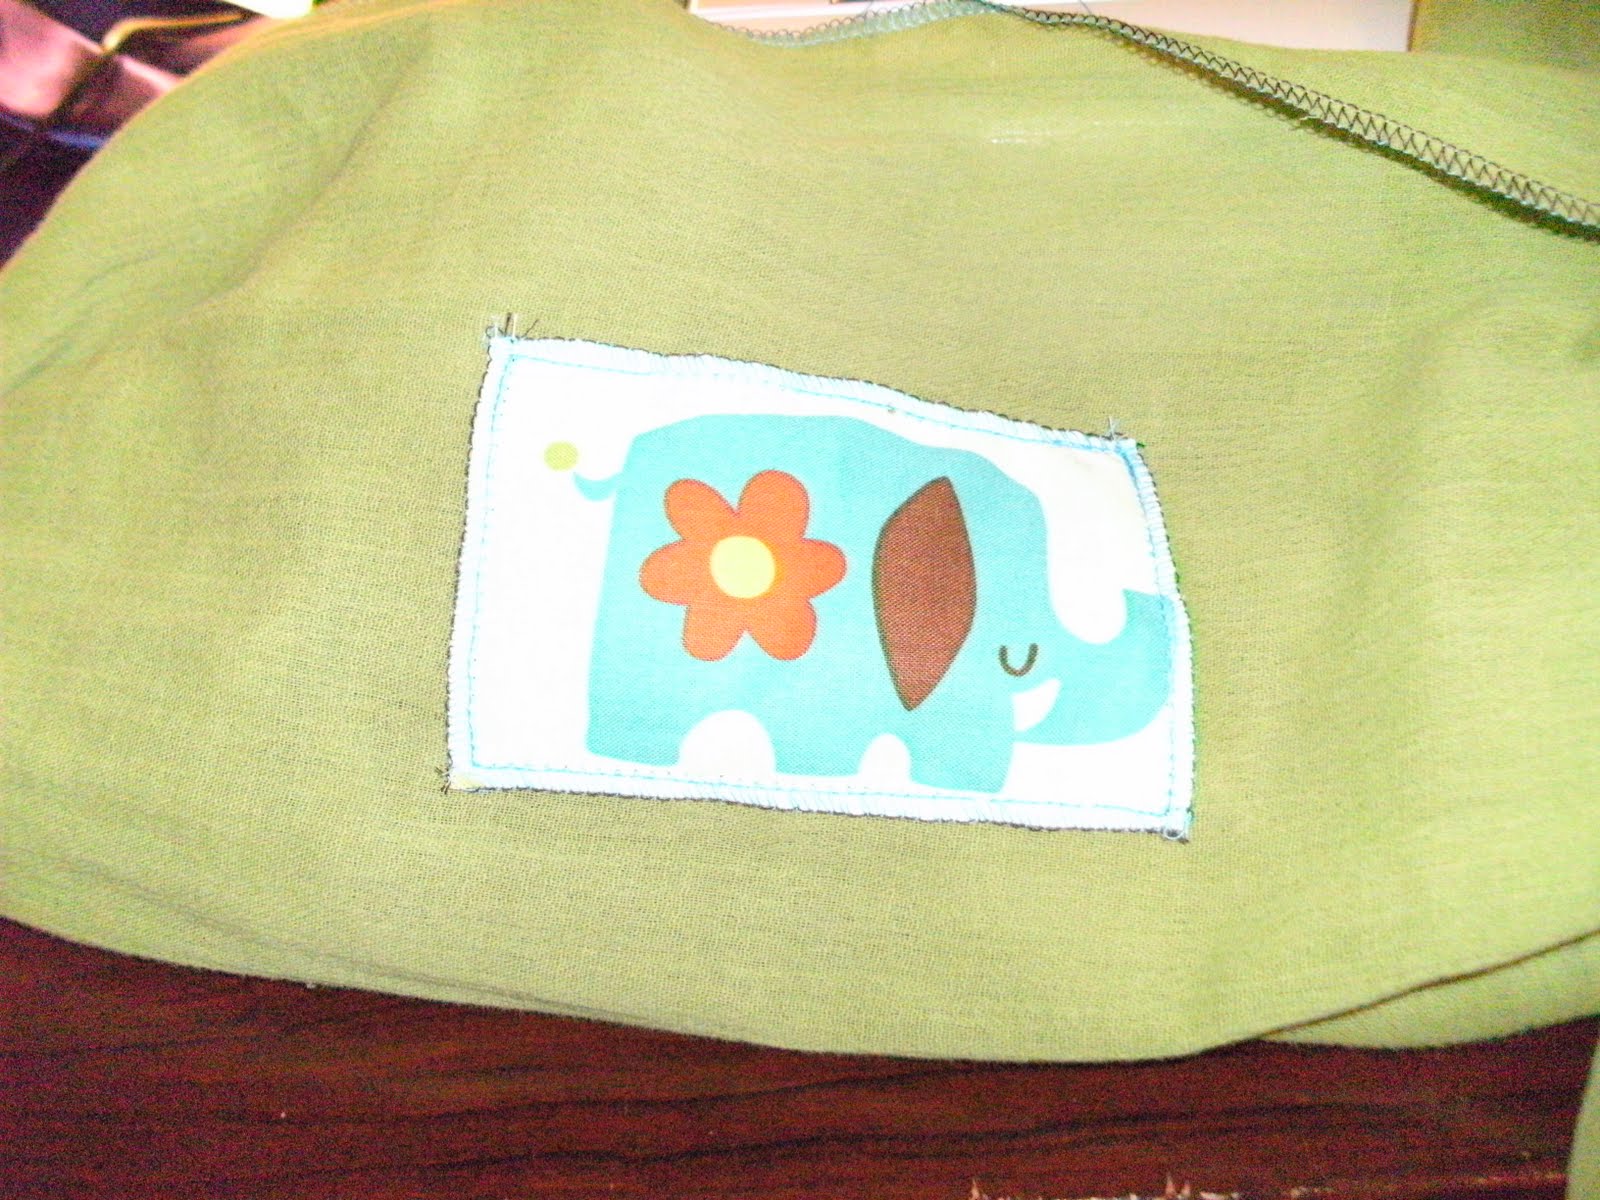
I used some cute animal print fabric to add an elephant applique (the theme for my friend's new little boy) to add personality and to mark the center of the wrap. Moby uses the tag for this purpose. I wanted something more fun. So, I cut out the image I wanted to use from a patterned piece of fabric and serged the edges. Again, you can use a narrow hem instead. I positioned it in the middle lengthwise a few inches below one edge (sticking it in the exact center will make it not show about 90% of the time. Putting it on one side makes that the "top" artificially, but oh well) and machine stitched it in place. Its that easy.
So, like I was saying earlier in a post about sergers, I don't have many colors of thread in the necessary 3 spool count. Green was no exception. For the wrap I used aqua, brown and yellow.

The finished product looks super cool - one side has brown edging and one has aqua (the needle thread on a serger doesn't really show much compared to the looper threads so use your least favorite thread if you want to hide it or the brightest one if you want it to pop). I never actually tried that before so it was exciting to see. 6 yards of fabric seemed to be just a little long, but I worry that going any shorter will make it hard to use on bigger kids.
Bottom line:
6 yards of gauze @ $2.50/yd (on sale) = $15
thread = negligible
Applique = negligible (I bought the fabric to use on other baby projects and only used a small rectangle of it - you could save scraps for this purpose)
since the fabric made 2 (I had a 45" wide), cost per wrap = $7.50
time = less than 1 hour with a serger, longer with just a sewing machine
Retail: $40 & up/each
Savings: about $33/wrap
To find out how to use your wrap, go to the Moby website.
So not everything you read on the internet is correct. Gasp. That or I am just an idiot. I posted a while ago that I got 2yd cuts of fabric for baby wraps. Well, when I went to try them out (before I cut thankfully), I discovered that they were WAY too short to successfully wrap around an adult body. Dismayed, I realized it really was 5-6 yards, not feet. The expense of the items just skyrocketed, but it was still better than buying retail. So, I went to hancock fabrics during a 50% off sale on gauze solids, and got myself some nice loose woven fabric.
How to make the "Fauxby" (Moby) Wrap:
(I apologize in advance for he lack of photos... My camera took a ton of really crappy ones that you can't see because of too much flash or too dark. I can't win...)
Cut 6 yards of fabric in half long ways (hot dog style for those that remember that) for a 45" wide fabric, in thirds for a 60" wide. This should give you either 2 or 3 long strips of fabric that are about 20" in width and 6 yards long. Take 1 long strip. This will be your wrap. Using a serger, finish all 4 edges. If you do not have a serger, use your sewing machine to make a narrow hem to finish all the edges. (To make a narrow hem: press under about 1/4" of fabric on each end. With the pressed edge facing down, press under 1/4" again from the pressed edge. The raw edge should now be enclosed by fabric. Machine stitch the top to keep the raw edge enclosed.) Your Fauxby wrap is now usable.
I used some cute animal print fabric to add an elephant applique (the theme for my friend's new little boy) to add personality and to mark the center of the wrap. Moby uses the tag for this purpose. I wanted something more fun. So, I cut out the image I wanted to use from a patterned piece of fabric and serged the edges. Again, you can use a narrow hem instead. I positioned it in the middle lengthwise a few inches below one edge (sticking it in the exact center will make it not show about 90% of the time. Putting it on one side makes that the "top" artificially, but oh well) and machine stitched it in place. Its that easy.
So, like I was saying earlier in a post about sergers, I don't have many colors of thread in the necessary 3 spool count. Green was no exception. For the wrap I used aqua, brown and yellow.

The finished product looks super cool - one side has brown edging and one has aqua (the needle thread on a serger doesn't really show much compared to the looper threads so use your least favorite thread if you want to hide it or the brightest one if you want it to pop). I never actually tried that before so it was exciting to see. 6 yards of fabric seemed to be just a little long, but I worry that going any shorter will make it hard to use on bigger kids.
Bottom line:
6 yards of gauze @ $2.50/yd (on sale) = $15
thread = negligible
Applique = negligible (I bought the fabric to use on other baby projects and only used a small rectangle of it - you could save scraps for this purpose)
since the fabric made 2 (I had a 45" wide), cost per wrap = $7.50
time = less than 1 hour with a serger, longer with just a sewing machine
Retail: $40 & up/each
Savings: about $33/wrap
To find out how to use your wrap, go to the Moby website.
Tuesday, August 9, 2011
How I love my serger - Let me count the ways: One, two, three threads...
Well, I am working away on the doublet for my hubby. Its coming along, but I refuse to even take pics of it because it is so far from complete. There are so many small steps to everything, like pressing, serging, turning, hand stitching, pounding eyelets, etc... Will I ever finish?
So I am taking a quick moment instead to say how much I love my serger. I have a Huskylock that my grandmother gave me. Meaning its really nice and barely used. She complained that she was too old to learn how to use something new. haha. So not true, Nana, but I am loving the new (to me) toy!
Assuming you don't know what a serger is, it is a machine that simultaneously trims a seam as it sews over the edge to prevent fraying. This does double duty at cleaning up the garment - no more bulky seam allowances and no more fraying! If you have done a zig zag stitch, the serged stitch looks similar, only it is done with 3 or 4 threads instead of only 2, and they wrap over themselves on the edge to really bind it up. The down side is, sergers are a PAIN to thread, and since they require at least 3 large cones of thread to work, they take a separate thread inventory and much longer to switch colors from project to project.
Random tip: You can quickly change the thread on a serger by cutting the old thread very close to the spool and tying the new thread to the old thread using a square knot. Once you have tied all three threads to their new counterpart, run the machine SLOWLY using the foot pedal. Watch the knot from the needle thread and do NOT let the knot run through the eye of the needle unless you want to buy a new needle! (it will break the needle or at the very least, bend it out of usability) Once the needle thread knot gets close to the eye of the needle, snip it out and thread the eye of the needle with the new thread by hand. The upper and lower looper thread will be fine running the knot through it, so don't worry about them. An alternative to watching the needle thread like a hawk is to just knot the looper threads and rethread the needle by hand as it is MUCH simpler than the other two.
So, the plus to having a serger is that all those seams that fray and ruin your outfit after a few washings or itch and rub on you, or that you feel you have to french seam are dealt with. Most ready to wear items (stuff you buy in a store) have serged seams, and it really does help with the durability of the garment. Some people skip machine sewing altogether and go straight to the serger when constructing something. I, however, make just enough mistakes to make this a very bad idea. I like the option of tearing out what I just did, so I machine sew and then clean up the seam with a serged edge. I don't have 3 cones of serger thread in many color varieties, so I find myself using white or black thread most of the time, which is fine since the seams are on the inside anyway. Its a good cheat :-)
But finishing seams is not the only trick sergers are good for! A serged seam in a contrasting color of thread can be great decoration, they can be a quick way to finish hemmed edges on shirts, skirts, and knit items (very trendy in RTW right now) without actually hemming, or a fast way to make cloth napkins or curtains and the like. Having a folded, finished hem is not always necessary, and having a pink edge on a white tee can be super cute, so feel free to play with the possibilities!
Monday, August 8, 2011
Shirt complete, only a crapload o' stuff to go
So I warned you - ren faire stuff may leak into my baby wrap timeline. True to form, here is some ren faire update stuff. :-) At the end I promise to give a quick update to baby things... its like the news at 11:00. all you want to hear is in the last five mins. Lucky for you, scroll bars were invented!
So, I am making an italian nobleman's costume for my husband for ren faire. We are going with a group (hopefully - very few people RSVPed...) and as usual, I am the one making costumes at the last second. Oh what WOULD I do without procrastination? I promised my husband a new costume last year since I made myself a court dress (read: fancy) and his musketeer costume, although cute when there were 3 of them, is not only from a totally different CENTURY, but is also no longer coordinating with mine. At all... So, I told him I would make him a court costume. Well that wasn't a big deal until I wound up preggers and now cannot wear my court dress. Copious amounts of boning and pregnancy do not mix. Now I have to make myself a court dress that will accommodate my big belly as well as make him a fancy over the top outfit. They take SO much longer than peasant garb, what with all the pieces, trims, frilly details and whatnots. Oh, did I mention I promised my nephew a pirate costume? Or my friend chuck a vagabond/ruffian type outfit LAST year that I did not deliver on? Oops...
So, here we are, 2 weeks out and I have (drum roll please) - One shirt complete.

Uh oh.
Lucky for me I have most of the notions and fabrics and such that I need. So now, just all the hard work lol. I have washed more loads of laundry than imaginable to prep the fabric for cutting. (random tip: always wash/dry your fabric the way you will wash/dry the finished garment so you don't end up with weird shrinkage. Most fabrics shrink more along one axis than the other which makes for a lovely distorted item if you skip this step) I wanted to hang dry most of it - try finding a place to hang dry 8 yards of fabric. yikes!
Anyway, I have the doublet main fabric and interfacing cut as of last night, but have yet to cut the lining. My sewing fingers are itching to get started, but I must have all the pieces cut first - new personal rule. It keeps me from cutting corners later in my eagerness to finish something.
 So, now to go finish cutting the lining, then to piece the darn thing together. I also broke a cardinal rule for this (one I frequently break) - I made no muslin (test garment) and then I cut into really expensive fabric. Fingers crossed everyone!
So all I have left is:
A hat for DH
New pants for DH if I have time
Shirt for nephew
Pants for nephew
vest or coat for nephew
Shirt for chuck (my friend)
Vest for chuck
Sash for chuck (easy yay!)
Pants for chuck
Dress for me? (time permitting)
That is so daunting... I need a nap....
Coming soon: finished Doublet?
Ack! I almost forgot! My promised update on baby wrap stuff! I purchased fabric at walmart the other day - I usually don't because the coupons from Joann's and Hancock are so awesome, but I was already there and I wanted to play around with some things. Go instant gratification. I did end up getting some quilters cotton - two prints for each style so it can be reversible. I liked the geometric stuff but then I found jungle themed stuff which is our theme so I had to buy it and its coordinate, too (I also plan to do some nursery stuff with it so I got extra :-)).
 I also got some woven gauze (left) for the airy one and a single stretch knit (very very mild stretch - right) for a stretchier version. Since they seem easy to make, I may try to whip one up this week still. We shall see.

So, I am making an italian nobleman's costume for my husband for ren faire. We are going with a group (hopefully - very few people RSVPed...) and as usual, I am the one making costumes at the last second. Oh what WOULD I do without procrastination? I promised my husband a new costume last year since I made myself a court dress (read: fancy) and his musketeer costume, although cute when there were 3 of them, is not only from a totally different CENTURY, but is also no longer coordinating with mine. At all... So, I told him I would make him a court costume. Well that wasn't a big deal until I wound up preggers and now cannot wear my court dress. Copious amounts of boning and pregnancy do not mix. Now I have to make myself a court dress that will accommodate my big belly as well as make him a fancy over the top outfit. They take SO much longer than peasant garb, what with all the pieces, trims, frilly details and whatnots. Oh, did I mention I promised my nephew a pirate costume? Or my friend chuck a vagabond/ruffian type outfit LAST year that I did not deliver on? Oops...
So, here we are, 2 weeks out and I have (drum roll please) - One shirt complete.

Uh oh.
Lucky for me I have most of the notions and fabrics and such that I need. So now, just all the hard work lol. I have washed more loads of laundry than imaginable to prep the fabric for cutting. (random tip: always wash/dry your fabric the way you will wash/dry the finished garment so you don't end up with weird shrinkage. Most fabrics shrink more along one axis than the other which makes for a lovely distorted item if you skip this step) I wanted to hang dry most of it - try finding a place to hang dry 8 yards of fabric. yikes!
Anyway, I have the doublet main fabric and interfacing cut as of last night, but have yet to cut the lining. My sewing fingers are itching to get started, but I must have all the pieces cut first - new personal rule. It keeps me from cutting corners later in my eagerness to finish something.

So all I have left is:
A hat for DH
New pants for DH if I have time
Shirt for nephew
Pants for nephew
vest or coat for nephew
Shirt for chuck (my friend)
Vest for chuck
Sash for chuck (easy yay!)
Pants for chuck
Dress for me? (time permitting)
That is so daunting... I need a nap....
Coming soon: finished Doublet?
Ack! I almost forgot! My promised update on baby wrap stuff! I purchased fabric at walmart the other day - I usually don't because the coupons from Joann's and Hancock are so awesome, but I was already there and I wanted to play around with some things. Go instant gratification. I did end up getting some quilters cotton - two prints for each style so it can be reversible. I liked the geometric stuff but then I found jungle themed stuff which is our theme so I had to buy it and its coordinate, too (I also plan to do some nursery stuff with it so I got extra :-)).


Thursday, August 4, 2011
Questing
As you may or may not know, DIYers are known for lack of follow-thru. Maybe its just me, but with a cute little acronym like UFO (Unfinished Objects) floating around out there in cyberspace, I am thinking its an epidemic. Heck, maybe even a pandemic. At any rate, I have a lot of projects going right now. I had planned a wedding that I started a bunch of stuff for that I am currently putting on hold because of Ren Faire and Shrimpy (my loving nickname for the uterine parasite I am currently nurturing. My first glimpse was a sketch on babycenter that totally looked like a shrimp...) However, I will get back to them. I just wish I had begun this blog sooner to catch the whole process of the wedding planning that never came to be - it would probably have helped some crazy bride out there. I know it would have helped me.
But I digress. As usual....
So CURRENTLY I am questing for some fabric to make a baby carrier from a la Moby wraps. When I found out they STARTED at $40 and went up from there and were literally nothing more than 5.5 ft long pieces of fabric, I got a little crazy in the head. Wow just as I wrote that I got even more mad - its not even in yards... its feet. Do you realize how little that amount of fabric costs?!?! Anyway, I pledged to make a few for some friends and eventually for Shrimpface as well. But oh the fabric choices!
Some good options I have come across with pros and cons:
Quilting fabric:
Pros: adorable, cheap, easy to find, durable/washable
Cons: no give, can be scratchy, I have a deep and abiding hatred of all things quilting and if I go into a fabric store I don't want people to think I am a quilter.
Knits:
Pros: a little give makes wrapping and insertion of offspring easier, cute prints
Cons: may slip due to that give, a PAIN to sew with, fairly pricey
Gauze/woven fabrics:
Pros: very breathable and cool, easy to scrunch/stretch while wrapping
Cons: solids only, does not stretch, expensive, may wear out quickly due to thin fabric
So, I am thinking (especially since my yards versus feet revelation) I will make several, use my friends as guinea pigs, and then take what I learned and apply it to my own creations!
In the mean time, I may make some posts about ren faire costumes since that is slightly more urgent (aug 20) than my due date (dec 26). But I do have the attention span of a goldfish, so interspersing of topics may occur.
Monday, August 1, 2011
Starting out
So what I want this blog to be. despite my first post, I do NOT want it to be a whiny rant about my life. I want it to be a useful how to page for life. I am going to be a mommy in December, so I have a lot to do before then. I am a dyed in the wool DIYer so there is a lot out there I want to learn and do and make. I cook, I sew, I craft, I clean. I am a stay at home wife (again, soon to be mom) and I do have a lot of time on my hands. But I understand a lot of people don't. SO, I will try to make this as normal-person friendly as possible while still getting in those complicated projects once in a while. I probably will update on my life from time to time, so dont expect it to be apersonal, but I will try to keep it about the projects, not about me. So thats my pseudo mission statement and I am sticking to it.
Up Next - my attempt at making my own baby carrier(s?)
Up Next - my attempt at making my own baby carrier(s?)
Subscribe to:
Posts (Atom)