Showing posts with label from scratch. Show all posts

Thursday, April 4, 2013

Homemade Sugar Free Applesauce

I started making applesauce for my son because I didn't trust commercial applesauces to actually be healthy and sugar free, and those little jars of baby food are way overpriced for just applesauce.  And then my husband tried it, you know, just licking off the spoon while feeding the baby.  Or something.  And now I am not ALLOWED to buy the store stuff haha.  Admittedly, I sometimes add a little brown sugar to get the apples to release their juices faster and add that caramel flavor, but its really not needed and I love the taste without.  This is a rough recipe because I usually make it "till it looks right" but I absolutely hate it when people say that in recipes, so I have done my best to measure things and time things at least generally.  Feel free to tweak where needed! :-)

Homemade Applesauce

4 Lbs of Apples - a mix of varieties is fine, and even recommended as long as they cook at roughly the same speed.  Choose a bagged bulk apple to save money.  Avoid using flavorless or overly tart apples like red delicious and granny smiths.  Try McIntosh, Pink Lady, Gala, Golden Delicious, or another tasty, firm fleshed variety.
2 t cinnamon
1/2 c raisins
Paring knife or peeler
chef's knife/santoku
Large stockpot or saucepan with a lid
food processor, blender, or potato masher
containers for storage

That's it!

1) Peel your apples using a paring knife or a vegetable peeler.  I prefer a knife because I think it actually goes faster while doing a better job and giving me more control, but I do tend to waste a little more apple.  If using a knife, make sure it is good and sharp to avoid slipping and cutting yourself!  Sharp knives are WAY less dangerous!

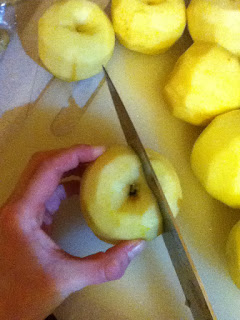
2) Once all your apples are peeled, use your chef knife to cut them into thin slices.  Rather than coring them the traditional way (cut into fourths and cut out the core with a paring knife, then slice into tiny wedges) which makes it hard to get even slices, try my way.  Put the apple on the board and place your knife about 1/4-1/2" away from the core.  Slice away that piece.


Put the apple cut side down on the cutting board and slice the same 1/4-1/2" away from the core on each side.

Turn to one side and cut out the last chunk.
I cut into the core which leaves hard pieces in the applesauce. Ick...
Hopefully you will have cleared the core!  If not try out a little farther on the next apple.  Slice each piece into thin slices (about 1/8" or so).  Try to keep your slices even.  If you have to, it is better to cut larger slices than to have uneven slices, because they will all cook at the same rate.  If you are very unsure of slices, cube them up.  Cubes work fine, but takes a little longer to cook.
Had to show off my good slicing!
3) Preheat your saucepan/stockpot on medium.  After all the apples are sliced, toss them in the pan.  They should sizzle just a tiny bit.  Cover the pot.  Stir them every 5 minutes or so, but try to keep them covered to keep in the moisture.  If the apples are sticking to the bottom, add a small amount of water (a Tablespoon or so) to loosen them up.  You may need to add more water if you have less juicy apples, but you would be surprised at how much water the apples release, and you are just diluting flavor when you add water, so hold off unless its absolutely necessary to keep them from burning!

If you don't see any steam, add a little water to the pot.
4) Cook about 15 minutes until the apples are starting to break down.  Add cinnamon and raisins to the pot. Cover and cook another 10-15 minutes until the apples are nicely broken down and the raisins are plump.


5) Dump the apples into a food processor or blender, or leave them in the pan and use a potato masher to smash them up (they may need to be a little more tender for the potato masher... use your judgement.  This is part of that "cook it till it looks right" thing haha).  Blend or process until the apples are in small pieces or completely blended if you want to use as a first food for babies.  I leave it chunky now because my 15 month old can handle it, but when he was first starting solids I added a little water or 100% juice and pureed the heck out of it!  It is delicious warm, or you can refrigerate 5 days or so, or freeze it in portions and thaw when you want it.  Makes roughly 5-6 cups. (10-12 jars of baby food)


Just add spoon.


If you like, you can add other dried fruit, add ginger or nutmeg with the cinnamon, or add some sugar.  Play with it and make it your own!  Hope you like it!
Wednesday, January 30, 2013

Tamale Pie Recipe

This is a long time coming to a lot of my friends and family.  I am terrible at remembering to give recipes to people.  Its not intentional as if I didn't want to share my culinary secrets or something, I am just really bad at remembering, and often too lazy to write things out via pen and ink or email.  Sue me.  I am busy surfing the web for random craft supplies.  Duh.  Anyway, this is a really popular (and super simple) recipe that I always get asked for.  Not sure exactly where it came from, although my mom says my grandma used to make it all the time.  So here it is!


Tamale Pie

Ingredients:
1 lb Hamburger, preferably ground chuck
1 small onion, chopped
1 clove garlic, minced or pressed through a garlic press
1-16 oz can tomatoes (I have used diced and stewed; different flavors but both good)
1-16 ox can corn, drained
1 can black olives, drained and sliced (or buy sliced olives)
3 T chili powder
1 1/2 t salt
1 c cornmeal
1 c milk
2 eggs, beaten
1 c shredded cheddar cheese

Preheat oven to 350.

Step 1: Brown the hamburger and onion in a large saucepan.  Drain.  Add garlic and cook till fragrant, about 30 seconds.
Step 2: While meat is browning, mix together cornmeal, eggs, and milk. Set aside.

Step 3: Stir tomatoes (with liquid), olives, corn, chili powder, and salt in with the meat mixture.  Heat till boiling.  Pour into a 13x9 glass baking dish. Stir up the cornmeal mixture (it will settle very quickly, so do this or it will be an uneven crust) and pour it over the meat mixture.  Top with cheese.

Step 4: Bake the casserole for about 50 minutes, until the crust is golden and the cheese is bubbly and delicious looking.  Let stand a bit before serving.  EAT.

There you have it.  The mostly canned ingredients (which are staples in my pantry) make it a super easy and often last minute meal at my house.  Hope you like it!


Tuesday, January 22, 2013

This is how I Roll

I haven't done a cooking post in a super ridiculous long time... So here we go.

I am REALLY tired of commercial bread.  It has all these weird ingredients which totally goes against healthy eating.  I am all about making my family as healthy as possible, but yeast scares the living crap out of me.  Its SO much work to make the dang bread and most of the time what I get is less than stellar, and sometimes downright inedible.  Which sucks when I put all my proverbial eggs in one basket and try my hand at bread to go with the soup I am making.  If it sucks, we have no bread.  Which makes this carb lover unhappy.  My dad has a breadmaker, and while the results are edible, they are far from fabulous.  So I continued with the mystery ingredients until a better solution presented itself.  Enter my happy solution.

Exercising the new top front teeth
I got this recipe off of Pinterest, and then tweaked it to make it manageable for weeknight meals and made them whole wheat instead of white rolls.

Whole Wheat Buttercrust Rolls
Original recipe from Jenna on Eat, Live, Run


Ingredients:
4 1/2 t dry active yeast (2 packets)
1/4 c warm water (about 125 degrees)
1 1/4 c hot water
1/3 cup sugar
1 stick butter, softened
5T powdered buttermilk
1.5 t salt
1/2 t baking soda
3 c whole wheat flour
1 1/2-2 1/2 c all purpose flour plus more for dusting
2 eggs

1 egg yolk plus 1 T warm water for wash

1) Dissolve the yeast in the water and let sit for five minutes, until foamy.

2) While the yeast is activating, microwave the 1 1/4c of hot water until really hot/starting to boil. Add the butter, stirring so the butter melts completely. Add the sugar and stir till it dissolves. Let cool for 5-10 minutes.

3) Meanwhile, mix flours*, baking soda, salt, and powdered buttermilk in the bowl of a standing mixer (you can knead this by hand if you want, but it takes some serious time and effort). Pour in the yeast/water mixture, followed by the semi-cooled water/butter/sugar mixture, and finally the eggs. Knead by hand or with the dough hook on your standing mixer until smooth and elastic, about six minutes (perhaps longer if doing it by hand). Make sure the dry ingredients are being incorporated, and stir a bit if needed. Add flour if the dough seems really sticky. If using a mixer, turn the dough out onto the counter, and knead a few times by hand.  Form the dough into a ball

4) Lightly oil a bowl and plop the ball in, cover with plastic wrap or a damp kitchen towel (to prevent the dough from drying out) and place in a warm area to rise (about 80-90 degrees is ideal).  Let rise till doubled in size or about 1 hr.

5) Preheat oven to 375. Punch down dough on a lightly floured surface and divide into 2-oz balls (use a food scale or make small golf balls). Roll each ball into a rope and tie it into a knot, trying not to let the end stick out too much.

6) Line baking sheets with parchment paper, place rolls about 2" apart, and brush each one with the egg wash. Bake for 20-25 minutes until golden brown.


* Add the lesser amount of flour at first.  Flour in different climates in different seasons will have varying amounts of moisture in them. As the dough mixes, sprinkle the flour in a little at a time until the dough has the "right" consistency.  Its hard to explain what the right consistency is, but here goes: it should be sticky, but not SO sticky that you cannot get it off your hands and is impossible to work with.  This dough is a little wetter than some other bread doughs, so don't worry if it is a little stickier than you are used to.  Just flour your work surface and carry on. :-)

My 1 year old son LOVES these rolls and I admit, I am a big fan, too.  I made the white flour version for Thanksgiving, and then gave the half whole wheat flour a spin recently, and both came out just stellar.  I may swap out the egg wash for a butter wash just to see what they do, but they are really glossy and pretty this way.  Enjoy your preservative- and weird-ingredient-free bread!


Friday, October 21, 2011

Baked Apples

Fall is here.  As much as I hate to say goodbye to the warmth of the summer sun, seasons are real in Wisconsin, and I have chosen to live here.  I CHOSE to live here?  I am an idiot.  But I digress.  With fall comes cooler temps, gorgeous colors, and a great excuse to heat the house with the oven.  So I get to do a lot more baking!  Also with fall comes fall tastes in the home - soups, cream, cinnamon, apples, squash... So many great things we don't get at other times of the year, right?  Hey, I am trying to look on the bright side, here.

As a kid growing up in California, I never had to deal with the extreme cold that is the north/midwest/hinterlands.  However, as it cooled outside, my dad and I did do a few things differently, mainly cooking warm things.  One of those was baked apples.  My dad was pretty much a fly by the seat of your pants cook (read: no planning and no training).  If he couldn't "throw" it together, we didn't eat it.  There is a reason I took over in the cooking department at a young age.  One thing he did make that totally rocked, though, was baked apples.  We would alternately make them in the oven or in the microwave depending on our patience level, but either way, the results were fabulous and for a seriously minimal amount of effort.  I set out to recreate this childhood favorite the way I remember it...

Baked Apples:
4 Granny smith apples (if you prefer, try a spicy apple such as a Mcintosh.  This does NOT lend itself well to soft or sweet apples like red delicious, although some people would argue with me)
Cinnamon
Brown sugar
Butter

1) Core the apples.  Score the peel with a paring knife down the sides in quarters and across the middle.

Bad drawing, but act like you were going to cut the apple in quarters and then in half across the middle, but only just score the peel.  It will  allow the juices to get out a little and make the apple easier to eat later.

Place them in an 8x8 baking dish.  If the bottoms are not flat on the bottom of the baking dish, cut a small slice off to make them sit flat.  This will keep the yumminess from leaking out.
2)  In the center of each apple, put 1T of brown sugar, about 1/4t cinnamon and 1T of butter.
3)  Put in 350 degree oven.  After 15-20 minutes of baking, check the apples.  They should have released some juices in the bottom of the pan.  Baste the apples with their juices and continue to bake, basting occasionally until apples are tender but not mushy, about one hour total depending on the size of your apples.
4) Cool the apples for about 5 minutes.  Using a spoon or solid spatula so you don't loose all the goodies inside, scoop the apples into a bowl.  Enjoy!

There are lots of variations - baking the apples in a little bit (1c or so) of OJ (add more sugar to this one or they will come out tart - granulated sugar works well), adding raisins or other dried fruit and various nuts to the mix, adding spices like nutmeg... Explore what you like and what your family likes.  You can serve them as is, with ice cream, whipped cream, or in just about any iteration.  This is so simple and will heat up your kitchen nicely for the cool evenings.  Its also a great way to make your house SMELL fantastic! :-)

Thursday, August 25, 2011

Making lasagna

So, I totally wimped out and purchased my fettuccine noodles for the other night.  Determined not to be too afraid to try something new, I decided to use my pasta maker for lasagna noodles instead.  A coworker of hubby's had a family emergency, so I decided to make them a lasagna to make things a little easier.  Thus began the all day affair in my kitchen making zucchini bread and lasagna...

To start things off, I read the instruction manual for my new pasta machine.  Wow... That was interesting.  It seems like it was written in Chinese and then badly translated to English... So useless.  For one thing there is no illustration for how to clamp it to a tabletop... So, through trial and error, I figured out how to work with the machine.  Then I used the included recipe for pasta dough.  Hurdle #2.  There was WAY too much flour to incorporate so eventually I gave up.  I kneaded it by hand way longer than the 2-3 minutes it recommended.  I added more flour to keep it from being sticky when I ran it through the machine to work it to a soft consistency, but it still didn't amount to the quantity in the recipe.  Then I began to thin the pasta sheets.  The instructions didn't have a guideline for lasagna noodles, so I guessed and made them pretty thin, the second smallest setting.  I think next time I will make them 1 thicker, but I am not sure it will be a hugely noticeable difference.  Then I cut them to a good length and boiled those puppies!  There were no cook times in the instructions, either, so I cooked them for about 4 minutes or so - I basically just cooked them until they looked right.  Other than looking pale compared to store bought noodles, they were pretty much indistinguishable.  They tasted good!  Success!  So I made my lasagna :-)

Jenni's Lasagna:

Noodles:
about 1 1/2 C all purpose flour plus more for dusting
3 eggs

in a bowl or on a floured worktop, create a well in the middle of the flour and crack in the eggs.  With a fork, incorporate the flour slowly into the egg without breaking the side of the well until the egg is no longer wet and runny.  continue to work the dough until it is less sticky, then knead in the flour by hand until well incorporated and the dough is not sticky when pulled apart.  Let the dough rest for 20 minutes.

Roll the dough out with a rolling pin into a narrow strip that will fit through the machine.  Run the dough through the widest setting.  Dust the rectangle with flour and then fold the strip in thirds.  Repeat 9 times or until the dough is very silky, dusting the dough each time and the machine as needed.  Dial the machine down size by size, cutting the length in half when it becomes too long to deal with and working each half separately, until the desired thickness is achieved.  Dust the sheets with flour and then cut them to the desired length for your pan.  I also cut some in half long ways (after I boiled them) because about one and a half sheets fit the width of my pan, but overlap is good too :-)  If using fresh spinach, drain the pasta water over the spinach to wilt it.

Rest of Lasagna:
1 lb ground beef or italian sausage
1 medium onion
1T or so italian spice
2 cloves garlic or ~1t garlic powder
1Lb frozen or fresh spinach
1 egg
1.5 oz or so freshly grated Parmesan
16 oz ricotta (the smaller container in the store)
1t parsley
8 oz mozzarella, grated
1 can Hunts Four cheese tomato sauce

Preheat oven to 350.  Brown meat and onion in med skillet over med hi heat; drain fat.  Add spices and cook until flavors meld, 2-3 mins.  Layer noodles in bottom of pan and spread the meat over the noodles.  Add 1/2 can of sauce over the meat and spread it evenly.  Add another layer of noodles.  Microwave the spinach until it is no longer frozen, or if using fresh, pour the hot noodle water over them to wilt it.  If you forgot this step, no biggie, just put it in raw.  It will wilt in the oven just fine, but the layer will be a bit bulkier.  Add another layer of noodles.  In a medium bowl, combine the ricotta, egg, parsley, and a little of the Parmesan (the rest will go on top of the lasagna so use your judgement).  Mix thoroughly and spread the mixture over the noodles.  Add another layer of noodles, spread the remaining sauce over the noodles and top with the mozzarella and the rest of the Parmesan.  Bake for 35-45 minutes or until the sauce is bubbling and the cheese on top is browning and bubbly.  Enjoy!