Wednesday, January 30, 2013

Tamale Pie Recipe

This is a long time coming to a lot of my friends and family.  I am terrible at remembering to give recipes to people.  Its not intentional as if I didn't want to share my culinary secrets or something, I am just really bad at remembering, and often too lazy to write things out via pen and ink or email.  Sue me.  I am busy surfing the web for random craft supplies.  Duh.  Anyway, this is a really popular (and super simple) recipe that I always get asked for.  Not sure exactly where it came from, although my mom says my grandma used to make it all the time.  So here it is!


Tamale Pie

Ingredients:
1 lb Hamburger, preferably ground chuck
1 small onion, chopped
1 clove garlic, minced or pressed through a garlic press
1-16 oz can tomatoes (I have used diced and stewed; different flavors but both good)
1-16 ox can corn, drained
1 can black olives, drained and sliced (or buy sliced olives)
3 T chili powder
1 1/2 t salt
1 c cornmeal
1 c milk
2 eggs, beaten
1 c shredded cheddar cheese

Preheat oven to 350.

Step 1: Brown the hamburger and onion in a large saucepan.  Drain.  Add garlic and cook till fragrant, about 30 seconds.
Step 2: While meat is browning, mix together cornmeal, eggs, and milk. Set aside.

Step 3: Stir tomatoes (with liquid), olives, corn, chili powder, and salt in with the meat mixture.  Heat till boiling.  Pour into a 13x9 glass baking dish. Stir up the cornmeal mixture (it will settle very quickly, so do this or it will be an uneven crust) and pour it over the meat mixture.  Top with cheese.

Step 4: Bake the casserole for about 50 minutes, until the crust is golden and the cheese is bubbly and delicious looking.  Let stand a bit before serving.  EAT.

There you have it.  The mostly canned ingredients (which are staples in my pantry) make it a super easy and often last minute meal at my house.  Hope you like it!


Saturday, January 26, 2013

These are a few of my favorite things... portable highchairs

I probably have more experience with this one than any of my other posts thus far. I don't usually buy more than one of something and use them both a lot, but my family lives in California and we go visit about twice a year. I can hardly handle packing clothes much less pack carseats, strollers, high chairs, diaper pails, etc. and babies need so much gear! So I ended up buying cheapo versions of stuff to keep there. And thus this post was born!

We take our little man everywhere with us, and even at home it is nice to have a strap to any chair kind of high chair that we can toss in the trunk and go.  He is so squirmy when he eats it darn near impossible to hold him while feeding, so this was a must for us.  We can take it to restaurants, grandma's, play dates, you get the idea.  And its nice to have at home, too, so we can have an extra seat when his little friends come and visit.

We have 2 travel high chair seats. One we use at home and was a little over $50. The other is in California and when I couldn't get one like we had at home off Craigslist (even though I tried for 3 days), I bought this cheaper version new for around $20-25.  The first I got on Amazon, and the second I got at Target, although both are available both places...

The first is the Fisher-Price Space Saver High Chair.
This high chair has a plush looking pad, a sturdy looking tray, a reclining seat, and a booster for when the child outgrows the high chair portion.  It does just what it says, and it looks fancy.  The reclining seat is kind of pointless to me, since I never really bottle fed, but maybe for some it would be useful.  It has shoulder straps, so once your kid is in this thing, they aren't falling out!  However, I feel like even in its most upright position it is reclined back too far, making for bad posture.  The tray is impossible to get on and off with one hand, which can be hard when wrangling a child.  It is a HUGE tray and while it is "dishwasher safe" the only way to get it to fit is to lay it flat across the bottom shelf.  No joke.  Also, it does not collapse at all.  If you want to take it with you, its the same size it always is, and while it fits in our trunk (we have a mid sized sedan) a smaller car would probably be out of luck, not to mention it takes up half the trunk space, then, which means the stroller wont fit...  Good thing we rarely use our stroller...  Needless to say, it has some issues with practicality.

Enter our "cheapo" version, the Fisher-Price Healthy Care Deluxe Booster Seat.
This doesn't have shoulder straps, a sexy looking pad, or a giant slide in tray.  After that, its all pros.  The tray snaps on with little pegs, meaning you can do one side, then the other = one handed.  It has a nifty little lift out tray on top of the tray that has a lid, so if you don't finish your cheerios, you can snap a lid on it and take it with without finding a new container for it all.  All three pieces (tray, food tray and lid) snap together pretty snug so they don't go flying apart.  But that's far from the coolest feature. It collapses.  The back folds down into the seat and the tray snaps on over it facing backwards to make this tiny little high chair cube.  And the strap you use to buckle it to the chair bottom can snap over the top of the tray to act like a handle.  Mind.  Blown.  Its like a parent actually used this one!  It also can be used as a booster seat, the seat bottom is adjustable in height and blah blah blah, but the compact portability is the huge selling feature here.  I would totally buy this one again.  I've considered ditching our expensive one to buy a second one of this for at home, but thus far I've felt too guilty about wasting the moolah.

So there you have it.  Cheaper can be better, folks!  Hope you can profit from my experimentation.


Tuesday, January 22, 2013

This is how I Roll

I haven't done a cooking post in a super ridiculous long time... So here we go.

I am REALLY tired of commercial bread.  It has all these weird ingredients which totally goes against healthy eating.  I am all about making my family as healthy as possible, but yeast scares the living crap out of me.  Its SO much work to make the dang bread and most of the time what I get is less than stellar, and sometimes downright inedible.  Which sucks when I put all my proverbial eggs in one basket and try my hand at bread to go with the soup I am making.  If it sucks, we have no bread.  Which makes this carb lover unhappy.  My dad has a breadmaker, and while the results are edible, they are far from fabulous.  So I continued with the mystery ingredients until a better solution presented itself.  Enter my happy solution.

Exercising the new top front teeth
I got this recipe off of Pinterest, and then tweaked it to make it manageable for weeknight meals and made them whole wheat instead of white rolls.

Whole Wheat Buttercrust Rolls
Original recipe from Jenna on Eat, Live, Run


Ingredients:
4 1/2 t dry active yeast (2 packets)
1/4 c warm water (about 125 degrees)
1 1/4 c hot water
1/3 cup sugar
1 stick butter, softened
5T powdered buttermilk
1.5 t salt
1/2 t baking soda
3 c whole wheat flour
1 1/2-2 1/2 c all purpose flour plus more for dusting
2 eggs

1 egg yolk plus 1 T warm water for wash

1) Dissolve the yeast in the water and let sit for five minutes, until foamy.

2) While the yeast is activating, microwave the 1 1/4c of hot water until really hot/starting to boil. Add the butter, stirring so the butter melts completely. Add the sugar and stir till it dissolves. Let cool for 5-10 minutes.

3) Meanwhile, mix flours*, baking soda, salt, and powdered buttermilk in the bowl of a standing mixer (you can knead this by hand if you want, but it takes some serious time and effort). Pour in the yeast/water mixture, followed by the semi-cooled water/butter/sugar mixture, and finally the eggs. Knead by hand or with the dough hook on your standing mixer until smooth and elastic, about six minutes (perhaps longer if doing it by hand). Make sure the dry ingredients are being incorporated, and stir a bit if needed. Add flour if the dough seems really sticky. If using a mixer, turn the dough out onto the counter, and knead a few times by hand.  Form the dough into a ball

4) Lightly oil a bowl and plop the ball in, cover with plastic wrap or a damp kitchen towel (to prevent the dough from drying out) and place in a warm area to rise (about 80-90 degrees is ideal).  Let rise till doubled in size or about 1 hr.

5) Preheat oven to 375. Punch down dough on a lightly floured surface and divide into 2-oz balls (use a food scale or make small golf balls). Roll each ball into a rope and tie it into a knot, trying not to let the end stick out too much.

6) Line baking sheets with parchment paper, place rolls about 2" apart, and brush each one with the egg wash. Bake for 20-25 minutes until golden brown.


* Add the lesser amount of flour at first.  Flour in different climates in different seasons will have varying amounts of moisture in them. As the dough mixes, sprinkle the flour in a little at a time until the dough has the "right" consistency.  Its hard to explain what the right consistency is, but here goes: it should be sticky, but not SO sticky that you cannot get it off your hands and is impossible to work with.  This dough is a little wetter than some other bread doughs, so don't worry if it is a little stickier than you are used to.  Just flour your work surface and carry on. :-)

My 1 year old son LOVES these rolls and I admit, I am a big fan, too.  I made the white flour version for Thanksgiving, and then gave the half whole wheat flour a spin recently, and both came out just stellar.  I may swap out the egg wash for a butter wash just to see what they do, but they are really glossy and pretty this way.  Enjoy your preservative- and weird-ingredient-free bread!


Thursday, January 10, 2013

Green living: reduce, reuse, recycle

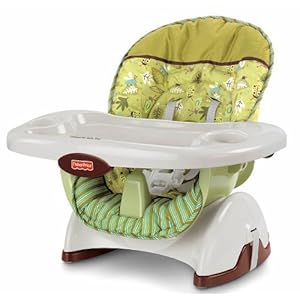
I grew up in Southern California. Not sure if region matters, but as a kid growing up I remember fun little recycling PSAs popping up between cartoons. The little diddy went: "Recycle, reduce, reuse! And close the loop." And the little logo was around a dinosaur named recycle Rex. So. Freaking. Cool. And so damn catchy it's still in my head twenty some years later.

So as I grew up, that is how I always see recycling. As a little PSA telling me to do my part before Ducktails.

Enter a dear dear friend who is much kinder to the earth than I. She said it reduce, reuse, recycle. Huh. Weird. She grew up here in Wisconsin. Maybe they had different little PSAs. And I dismissed it.

Well, one day we got to talking about stuff, and she said it again. Reduce, reuse, recycle. She continued on: the order is important. You do the first one first, and so on. You see, manufacturing items is a huge cost to the environment. Energy is used, meaning electricity and fossil fuels are spent; raw materials are used, meaning mined or cut down or drilled or whatever; the materials are then processed, which often takes a load of chemical reactions, so there are by products generated which are generally not Eco friendly; and there is transportation and packaging and warehousing and more transporting and and and.... So by the time it gets to you, the consumer, the worst what we do to the earth is done. Sure, tossing it in a landfill to not rot is a slap in the face, but simply recycling doesn't redeem that little yogurt cup in your hand. It's got a hell of a debt to pay off. And that doesn't even count the extra energy, chemicals, packaging, etc that t takes to turn the ten into something usable AGAIN. The recycling process is not as simple as sending all your pasta jars back to ragu to be refilled. They have to be broken down into usable components and reprocessed. And sometimes recycling has a worse chemical footprint because you have to get back to a raw material rather than starting there...

So back to the point: the order is key.

Reduce first. Consume less. But in bulk with less packaging or buy local with no packaging at all. Don't buy presliced or processed or packaged. All that handling costs the earth.

Next, reuse. Think. If you used every disposable item one time after its initial use, you would cut your consumption in half. I'll wait for that to sink in for you. 50% less across the board. Imagine what just that step would do for the earth. Makes you want to hang on to that plastic water bottle, doesn't it?

And finally, recycle. I'm not saying Dont recycle. We live in a world where packaging is almost inescapable. I can't buy underwear that isn't on 2 hangers and double plastic sealed for freshness. But before you just toss things in that green can in the garage, ask yourself if it is still useful, and rescue it if you can.

Okay, enough with the preachy and on to the practical. Here are a few RRR things I've done.

I (almost) never use plastic bags. I have a zillion little plastic containers that I use instead. And yes they require a quick rinse before reuse, but that's hardly the ecological impact of petroleum processing. I pack lunches with them, I store leftovers in the freezer, I put jewelry making supplies in them... I'm an equal opportunity container-er. And while I have my fair share of ziploc containers, do one better and save sour cream and yogurt containers to do the same thing. DISCLAIMER: not all plastics are safe for hot foods or microwave use. I transfer food when cold and reheat on a plate when using repurposed containers. This is important!!

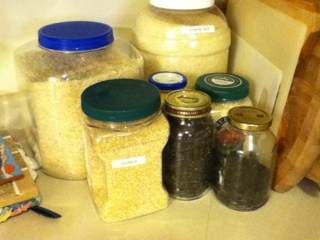
I use old glass and plastic jars (labels removed) to store dry goods like rice, beans, lentils, quinoa, bulgur, and other weirdo foods so they stay fresh and I can have them out on my counter. I totally stole thus idea from "reuse first" girl. I love her. My kitchen has never been more organized. It's great for buying things from those big bulk hoppers at the store... Hint hint.


I also reuse baby food jars for storing my homemade baby food - I bought baby food on Craigslist just so I could have the jars... But that's a separate crazy lady story!

Buy in bulk instead of more packaged little things. I buy a vat of yogurt and put it in awesome little glass custard cups made by anchor hocking. Get stuff out if the aforementioned bulk bins instead of in jars or boxes or pouches. Buy the jug of juice and get a thermos. It's way cheaper that way, too. They charge you a convenience fee for all that marketing! I mean, packaging... Sorry bout that little slip... ;)

Use little plastic containers (and milk jugs with the top cut off) to start plants indoors, or for a kitchen herb garden. Wisconsin's growing season is like 6 days so many plants have to be started indoors and then transplanted. Poke Giles in the bottom, set them in their own lid, and voila you have a potted plant. Egg cartons work even better because you can just bury them in the soil and they break down. The downside is watering during the indoor phase gets... Tricky :)

Finally, I cloth diaper. Yeah yeah I know. I'm an incurable granola hippie type that doesn't live in the real world. Only I'm not. I am a stay at home mom and my kid doesn't have to go to day care, but more and more places are kosher with cloth. I assure you, it's MUCH cheaper than disposables and its not that hard to do. The diaper technology has come a LOOOONG way from our mother's and grandmother's diaper pin pricked, rubber pants wearing days. How about snaps, Velcro, and laminated diaper covers for starters? Okay enough soapboxing.

My point is, there are so many ways we can reuse what we have instead of consuming more. I'll admit, my post today was inspired by a book I am reading "7, an experimental mutiny against excess" by Jen Hatmaker. It's changing my life and I anticipate buying a copy for everyone I know. But today I started imaging a post-apocalyptic type world. What would I save if I knew there wasn't more just around the corner? Jars and lids and containers. Huge. Water? Not running down MY sink! Clothes? Only a few holes = stylish. The thing that got me the most revolves around my crafty nature. Would I EVER let a garment leave my hands without first stealing all the buttons? And the zippers?