Warning: the instructions are quite lengthy. You may want to read through them all before starting to make sure you understand completely!
Curtain panel with tabs for hanging:
This style of curtain panel uses tabs for hanging. If you prefer to make a casing and scrunch the fabric over the rod, make the top like the bottom and be sure to add enough length to accommodate the wider hem.
What you need:
- Enough fabric for your window (add a little length for hems and seam allowances, but the width should be at least double to make it hang nicely and give that cute bunchy look) Make sure you have washed and dried it ahead of time so your project doesn't shrink or warp.
- cloth belting or extra fabric to make tabs
- sewing machine
Step 1: Cut the panel from the piece of material you are using. Try to get the edges as straight as possible. This will make hemming easier.
Step 2: Press up the raw edge on the "bottom" of the panel. Press up another 1 1/2" or so to make a nice wide hem.
 |
| Pressing up about 1/2" of raw edge. |

Step 3: Press in the raw edges of the sides (I used the full width of the fabric and had to deal with hiding the ugly selvage edge so I pressed in 5/8" which is way more than normal. I would stick to 1/4"-1/2" normally). Press in another 5/8" or so to enclose the raw edge. NOTE: the finishing of edges can be done with a serger, but for this project I much prefer the look of fully hemmed edges.
 |
| SO much selvage to hide. Ick. |

Step 4: Stitch the side edges of the panel close to the inside edge.

When you get close to the bottom edge, fold under the raw edge along the pressing mark and tuck it in so you sew over the folded piece and the end is now enclosed. You can skip this step if you like, but it will keep any threads from escaping and makes the final product look more "finished". This is especially important with thin materials like chiffon, organza, or light breezy cottons that could fray in the wash.
 |
| Stop stitching and lift the presser foot with the needle all the way down when you get to the first pressed mark. |
 |
| Tuck up the section of raw edge you pressed up. |
 |
| Fold it under the presser foot along the whole length of the bottom. You will stitch through all thicknesses. |
 |
| It should look like this when done correctly. |
Step 5: Stitch the bottom hem of the panel close to the top fold. This will leave open sides which you can choose to sew shut or leave open. The choice is purely cosmetic and is up to you. I left mine open.


Step 6: Press up the raw edge of the top of the panel. Press up another 5/8" or so to match the width of the sides.
 |
| Leave sides open to accommodate the curtain rod |
NOTE: If you do not want to use tabs to hang your curtain, press up enough fabric to go over the rod. This will depend on the diameter of the rod. Measure around the circumference of the pole and divide that number in half. Add extra for ease and for seam allowance. Press up that measurement and finish as you did the bottom hem. Alternately, you can enclose the raw edge before making the casing (press up a small amount once more and stitch across before pressing up the casing). This is important if using a fabric that ravels easily. You are now done and may disregard the rest of the instructions.


NOTE: If you want to make tabs from fabric, cut a strip of fabric twice as wide as you want the tabs and long enough to cut all the tabs. You may need 2 strips to get the necessary length. Press the strip in half with wrong sides together. Open up the fold and press the long raw edges in to the center fold mark, again, with wrong sides together. Refold the first fold, enclosing those raw edges and stitch along both long sides of the strip. You only have to stitch the open side to encase everything, but for strength and to prevent stretching and warping, I do both. Cut your tabs to the appropriate length.
 |
| One |
 |
| Two |
 |
| Three! |
Step 8: Open up the hem on the top of the curtain and at each marking, pin a tab. The raw ends of the tab should face in to the fold, and the loop of the tab should be sticking out beyond the fabric edge.

Stitch over the ends of the tabs to hold them in place.

Sew the top hem for the curtain. "Oh no!" you say. "My tabs are now sticking down. How awful!" Before you reach for the seam ripper, read on. This is how it is supposed to go. :-)

 |
Step 9: For each tab, do the following:
a) Fold the tab up so the loop extends beyond the edge of the curtain. Make sure it is going straight up and not at an angle. Press if necessary/desired.
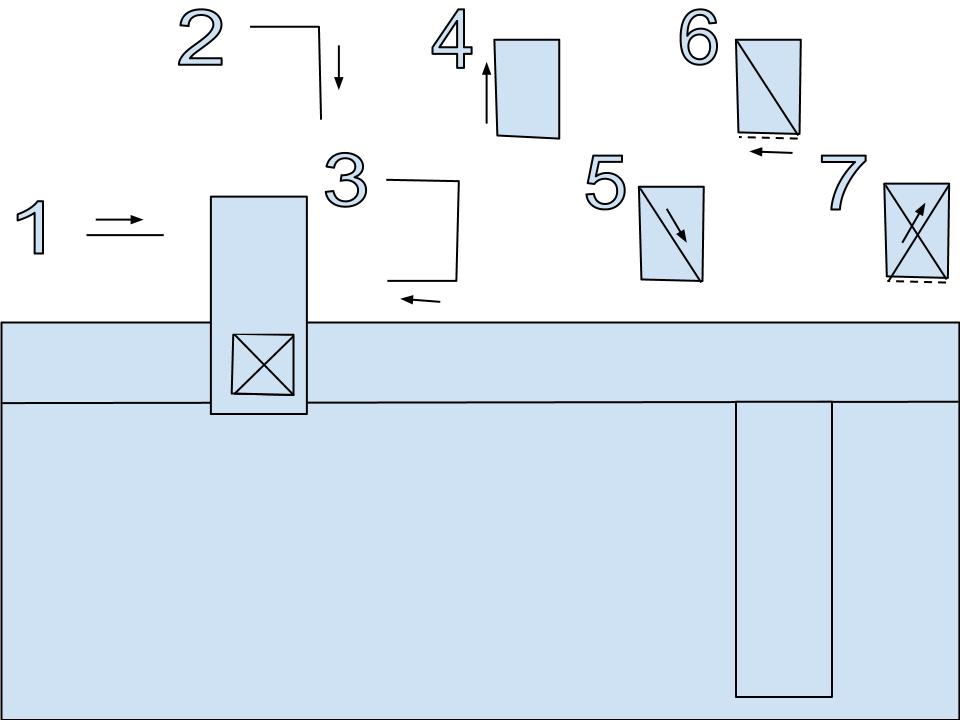
b) To reinforce each tab, stitch a rectangle with an x in it inside the tab part that is in the hem allowance. I call this a "barn door" because it looks like the x on a barn door to me. Stitch across the top of the tab, down the side, across the bottom, up the side, diagonally to the bottom corner, across the bottom again, and diagonally to the top and off the fabric (see illustration). Do all this without breaking stitching. To avoid breaking stitching, when you get close to the end of a line of stitching, use the hand wheel to advance the needle all the way down in the last stitch. Lift the presser foot and rotate the fabric to stitch the next line. Put the presser foot back down and stitch the line. At the end of that line, repeat the process. Be sure to keep excess fabric out of the way of the needle. Remember that you can rotate the fabric in any direction. Sounds silly, but I catch myself doing it all the time and bunching up the fabric for no reason!
c) Clip the thread ends and move on to the next tab. When all tabs are complete, you are done!
Anyway, there you have it! A simple yet elegant solution to all your window covering needs (and shower curtains and closet covers). And all it costs is the yardage of fabric. The one I made came from bargain bin stuff at Walmart. You know, the 5 yds for $5 bolts of stuff? Yeah. Nasty to wear, great to curtain with! I think this thing cost me $2 to make. Wow....
One last note - if you really are making a shower curtain, consider not using tabs. Instead, finish the top edge with a wide hem and put in large eyelets. That way you can clip it on to your shower curtain rings along with the liner. Hmm... another how to perhaps... Happy Sewing!
No comments:
Post a Comment