Ahh it's that time of year again. The only reason I will EVER look forward to fall is because of Halloween. Well, maybe when kidlets are older I'll look forward to school starting, but for now, it's Halloween or bust.
And this year we have a new person to dress. Much like Ren Faire this year, the thing I am looking forward to most is the costume for little man. Sure, I am making something awesome for a friend of mine and I am working on a quilt/duvet cover I have been commissioned to make (and I am CLUELESS by the way), but the thing I am thinking about most is a cool costume for my son. And of course, I want to go as a themed family unit, so now I am pondering the options for all three of us. And I have GOT to start sooner this year so I am not making a costume right before we leave for the party like I did last year while preggers. Although I have not completely made up my mind just yet, Hubby seems to really like the idea of little man going as Mario, so I think that is what will end up happening. But here are some of our family themed ideas. WARNING! They are incredibly nerdy, and most are video game related. :-)
(Order: Mother, father, baby/child)
Samus, Space pirate, Metroid larva (from Super Metroid) <-- My personal favorite
Zelda, Link, Young Link or Navi/fairy
Mrs. & Mr. Pac Man with a dot or a ghostie
Princess Peach, Mario, Toad
Princess Peach, Bowser, Koopa Kid/Bob-omb/Koopa
Maid, Butler, Child in frilly gown or mini tuxedo/suit
Wendy, Peter Pan, Lost Boy
Three nesting tetris blocks
These are only those I could remember off the top of my head. I can't seem to find the piece of paper I wrote all my ideas down on. Oh well! I may post more in the future, just for fun. Happy Halloween!
Showing posts with label Halloween. Show all posts
Showing posts with label Halloween. Show all posts
Tuesday, September 18, 2012
Monday, October 31, 2011
Simple Halloween Costume
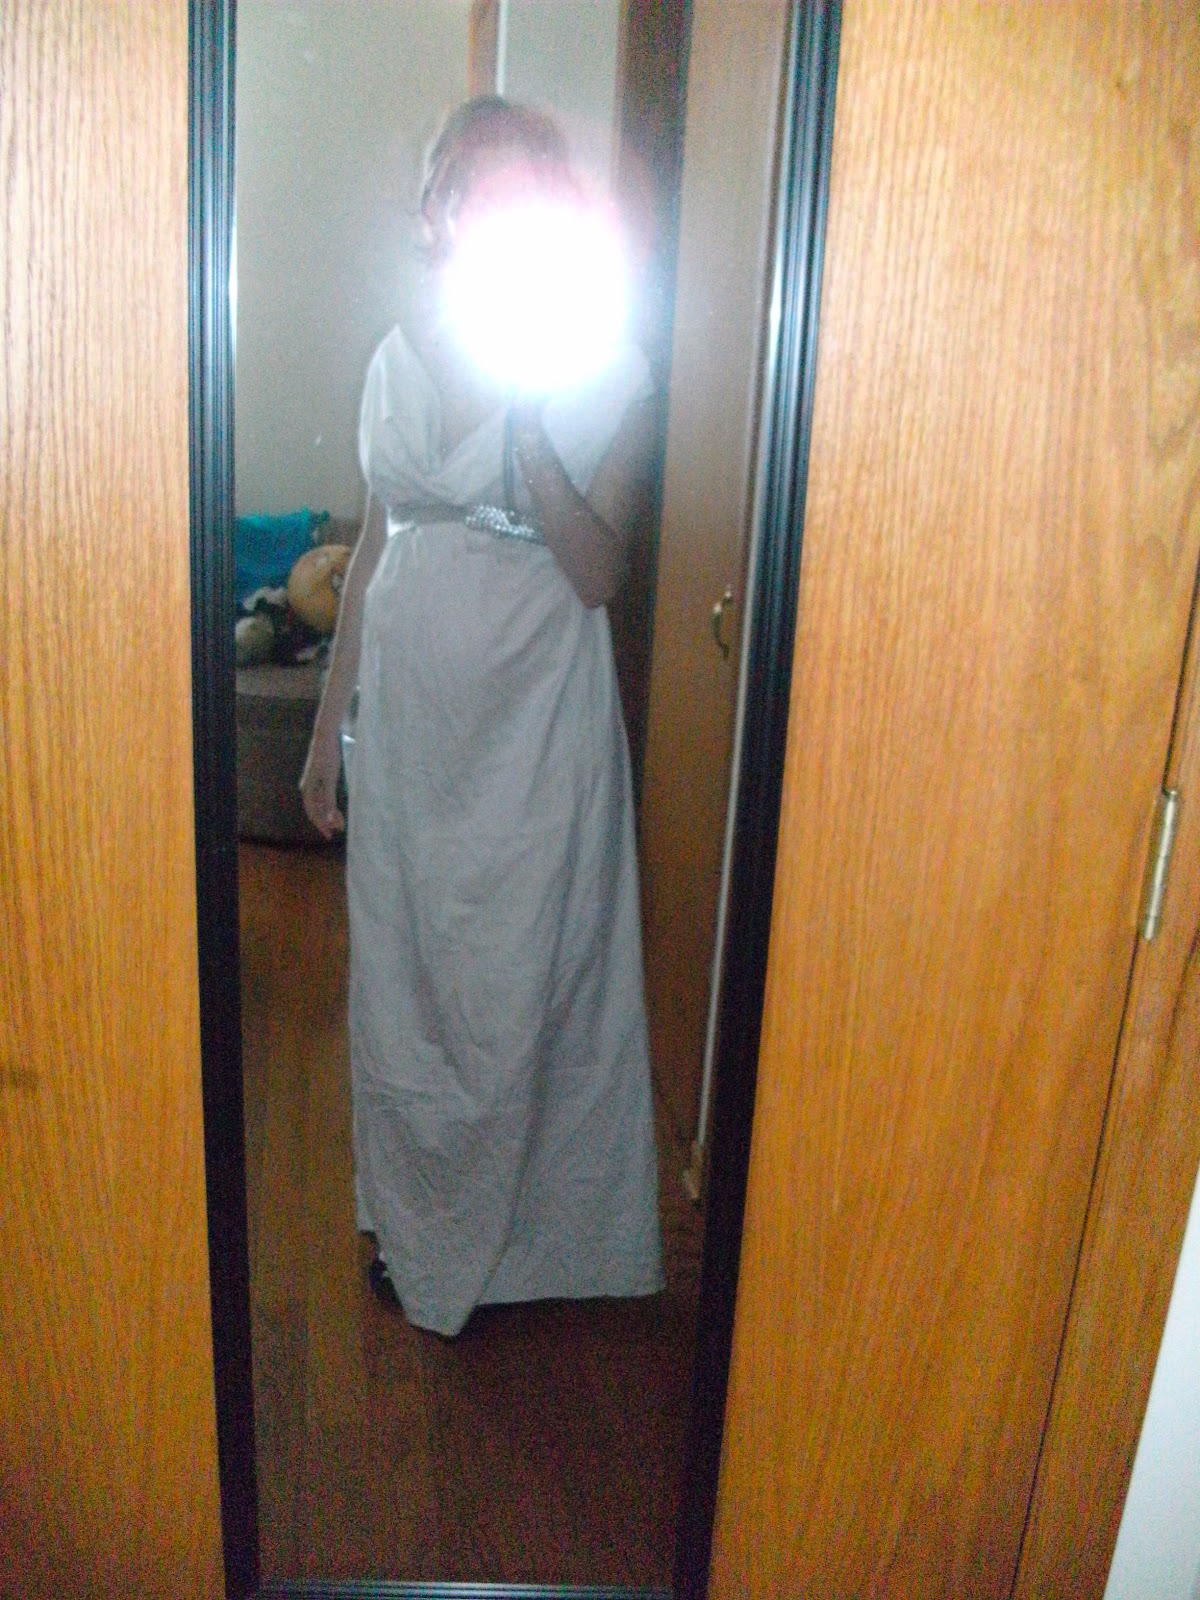
I'm Pregnant. About 7 months along now. Halloween is hands down my favorite holiday. Unfortunately for me, "Mean Girls" had it right - all Halloween is, for youngish women at least, is an excuse to wear a slutty outfit and some animal ears. For years, I have not been above that. I've been a sexy kitty, a playboy bunny, a tiger, catwoman... And then some non animal things like a sexy vampire, or reusing my ren faire costume. Don't worry, it was still sexy. Corsets shove your boobs up. :-)
It looks like I will have to leave the sexy to the other women in the world this year. I am too round to be classified as "sexy" I think.
I hate buying commercial costumes because they are so cheaply made and cost so much, but it doesn't matter this year anyway. There is no such thing as a maternity costume. Apparently my only option while preggers is to buy a plus sized costume. Well, my belly may be round, but the rest of me is far from plus size and I doubt that is a viable option for me. I did scope Target.com for some ideas about what to be, and I found a cute little number that will be empire waisted enough to flow over the curves. A greek/roman goddess. Yay for feminine and pretty and still a little sexy!
Since a pattern wont fit me without major modifications, I decided to wing it. Its a simple enough silhouette, so I should be able to make it work, right? Feel free to make it short and save on fabric.
Self-Faced Greek/Roman Goddess Dress Costume
You will need:
about 4-5 yards of white cotton fabric, either 45 or 60 inches wide is fine
a belt, pretty sash, chain, or ribbon to cinch the waist
a top (or dress) with a cowl neckline that fits you well
dressmaker's pencil, chalk, or fabric pen with disappearing ink for tracing lines
a good pair of shears - you will be cutting through 4 layers of fabric
sewing machine and thread
serger (optional)
Step 1: Lay out your fabric. To make your outfit the most symmetrical possible, fold it in half long ways (if you bought it on a standard bolt, you can use the center fold line from that). Place your top on the fabric. The midline of the top should match up with the center fold of the fabric. Leave some extra fabric sticking out above the top for the self facing. For how much extra to leave, see step 5.
Step 2: Trace around the outside of the top. Leave a seam allowance of about 5/8" while you trace around, except for the top of the neckline which should stay straight across.

Step 3: Measure how much skirt length you will need. Measure from where the shirt ends on you to where you want the skirt to end and add just a little bit for a hem. I made mine floor length and needed to add 35". Mark the length and use a straight edge to draw a line across the whole width of the fabric.

 Step 4: Now you get to freehand the silhouette of the skirt. Connect the line from tracing the top to the hemline. Depending on how full you want the skirt and how wide your fabric is, you may want to run it all the way out to the selvage edge, but you may want to make it a little more tapered, depending on your preference. I ran mine out all the way to the selvage edge. I also didn't follow the line of the top very well since it doesn't actually fit me, but you get the idea.
Step 5: Now that you have your outline drawn, you are ready to cut! To create the self facing top, you will need to fold under the top edge of the fabric at the neckline so you are cutting an extra layer. This actually means that you are cutting through 4 layers of fabric since it is already folded in half. Make sure there is enough overlap to reach just below the armhole edges.

 When you open out the facing, it will look like this:


Step 10: Match up front and back side seams of dress and stitch along seam allowance from armhole edge to hem. Make sure you catch the piece of facing that overlaps and stitch that along with the side seams to hold it down.

Step 11: Try on dress. If needed, trim the hem a little so it falls where you want it to fall, and to make it even. The hem may not be perfectly straight since we did not curve the lower edge, but it should be close enough. If it really bugs you, feel free to tinker! :-) Hem the lower edge and you are done!
Step 12: Put dress on and use the belt or ribbon or whatever to tie around your waist or just under the bust for an empire waist. Adjust the fullness of the neckline to suit you and admire your hard work!


 Bottom Line:
5 yards fabric at $2/yd = $10 (Use muslin or bargain bin fabric for this! I used some stash fabric I have had since 2005. No cost to me! YAY!)
Total cost: $10
Total time: about 3 hours, including figuring out how to cut and assemble. Should be less for you!
My neckline was a little too loose when I bent over, but I don't think hubby minded looking down my dress all day. My armholes were a little snug, too, so I went back and made them a little larger. If you don't have a cowl neck top to copy, just make a straight line across the top and try using the armhole outline from another sleeveless top. Copy the general shape of my layout and you should be okay. This isn't high fashion quality sewing... its meant to be an alternative to a bedsheet with eyes cut out!
A few general notes: the self facing may seem like a pain to cut and sew, but it will prevent you from having to bind all your edges, which I absolutely hate doing, as well as allow for a second layer of fabric along the bust which adds to modesty. You choose which you prefer and roll with it. If you are tracing a stretchy top, beware! If it has to stretch to fit you, leave some extra in there otherwise the non stretchy cotton will not fit! Also, whcn choosing fabric, don't pick something so cheap that it is see thru! Good Luck!
Happy Halloween!
It looks like I will have to leave the sexy to the other women in the world this year. I am too round to be classified as "sexy" I think.
I hate buying commercial costumes because they are so cheaply made and cost so much, but it doesn't matter this year anyway. There is no such thing as a maternity costume. Apparently my only option while preggers is to buy a plus sized costume. Well, my belly may be round, but the rest of me is far from plus size and I doubt that is a viable option for me. I did scope Target.com for some ideas about what to be, and I found a cute little number that will be empire waisted enough to flow over the curves. A greek/roman goddess. Yay for feminine and pretty and still a little sexy!
Since a pattern wont fit me without major modifications, I decided to wing it. Its a simple enough silhouette, so I should be able to make it work, right? Feel free to make it short and save on fabric.
Self-Faced Greek/Roman Goddess Dress Costume
You will need:
about 4-5 yards of white cotton fabric, either 45 or 60 inches wide is fine
a belt, pretty sash, chain, or ribbon to cinch the waist
a top (or dress) with a cowl neckline that fits you well
dressmaker's pencil, chalk, or fabric pen with disappearing ink for tracing lines
a good pair of shears - you will be cutting through 4 layers of fabric
sewing machine and thread
serger (optional)
Step 1: Lay out your fabric. To make your outfit the most symmetrical possible, fold it in half long ways (if you bought it on a standard bolt, you can use the center fold line from that). Place your top on the fabric. The midline of the top should match up with the center fold of the fabric. Leave some extra fabric sticking out above the top for the self facing. For how much extra to leave, see step 5.
 |
| Mine is not centered over the fabric because this is a non maternity top and I needed it to go round the belly! |

Step 3: Measure how much skirt length you will need. Measure from where the shirt ends on you to where you want the skirt to end and add just a little bit for a hem. I made mine floor length and needed to add 35". Mark the length and use a straight edge to draw a line across the whole width of the fabric.


Step 5: Now that you have your outline drawn, you are ready to cut! To create the self facing top, you will need to fold under the top edge of the fabric at the neckline so you are cutting an extra layer. This actually means that you are cutting through 4 layers of fabric since it is already folded in half. Make sure there is enough overlap to reach just below the armhole edges.

Cut along your traced lines.


Step 6: Use your cutout as a template for the back of the dress. I made mine a lot narrower since I am pregnant and it saves on fabric not to have so much extra width, but you can just reuse the same shape. Cut an exact replica on the fold again so you have 2 of the same piece.

Step 7: Now we get to the sewing part! Unfold the two pieces. Finish the top edge of the facing for both. Either run it through a serger or create a narrow hem so the edge does not fray. It doesn't have to be beautiful as it will be turned to the inside, but you don't want the facing falling apart.
Step 8: With right sides together, fold the facing toward the dress along the neck edge. Pin the facing and the dress together along the armhole edges. Stitch the armhole edges together at the 5/8" seam allowance. Stitch again, close to the stitching inside the seam allowance and trim the seam. Repeat for both sides and for front and back. Turn the facing right side out.
 |
| I pinned the extra down the side, but do not stitch there. Only stitch the curved armhole edge! |
 |
| double stitch to reinforce and then trim so you can turn the facing in. If it still wont turn, clip the curve. |
Step 9: Along the shoulder seams there will now be a kind of "pocket". To stitch the shoulder seams, you will have to fold the seam allowance of the back piece into the pocket and slip the seam allowance of the front piece into the opening. Make sure the shoulder widths of the two pieces are even by sliding the pieces together or apart as needed, then top stitch them together. Repeat for both sides.
 |
| Edges are not yet even, slide them around until they match up! |


Step 11: Try on dress. If needed, trim the hem a little so it falls where you want it to fall, and to make it even. The hem may not be perfectly straight since we did not curve the lower edge, but it should be close enough. If it really bugs you, feel free to tinker! :-) Hem the lower edge and you are done!
Step 12: Put dress on and use the belt or ribbon or whatever to tie around your waist or just under the bust for an empire waist. Adjust the fullness of the neckline to suit you and admire your hard work!


5 yards fabric at $2/yd = $10 (Use muslin or bargain bin fabric for this! I used some stash fabric I have had since 2005. No cost to me! YAY!)
Total cost: $10
Total time: about 3 hours, including figuring out how to cut and assemble. Should be less for you!
My neckline was a little too loose when I bent over, but I don't think hubby minded looking down my dress all day. My armholes were a little snug, too, so I went back and made them a little larger. If you don't have a cowl neck top to copy, just make a straight line across the top and try using the armhole outline from another sleeveless top. Copy the general shape of my layout and you should be okay. This isn't high fashion quality sewing... its meant to be an alternative to a bedsheet with eyes cut out!
A few general notes: the self facing may seem like a pain to cut and sew, but it will prevent you from having to bind all your edges, which I absolutely hate doing, as well as allow for a second layer of fabric along the bust which adds to modesty. You choose which you prefer and roll with it. If you are tracing a stretchy top, beware! If it has to stretch to fit you, leave some extra in there otherwise the non stretchy cotton will not fit! Also, whcn choosing fabric, don't pick something so cheap that it is see thru! Good Luck!
Happy Halloween!
Sunday, October 30, 2011
Giant Soft Pretzel Skeleton
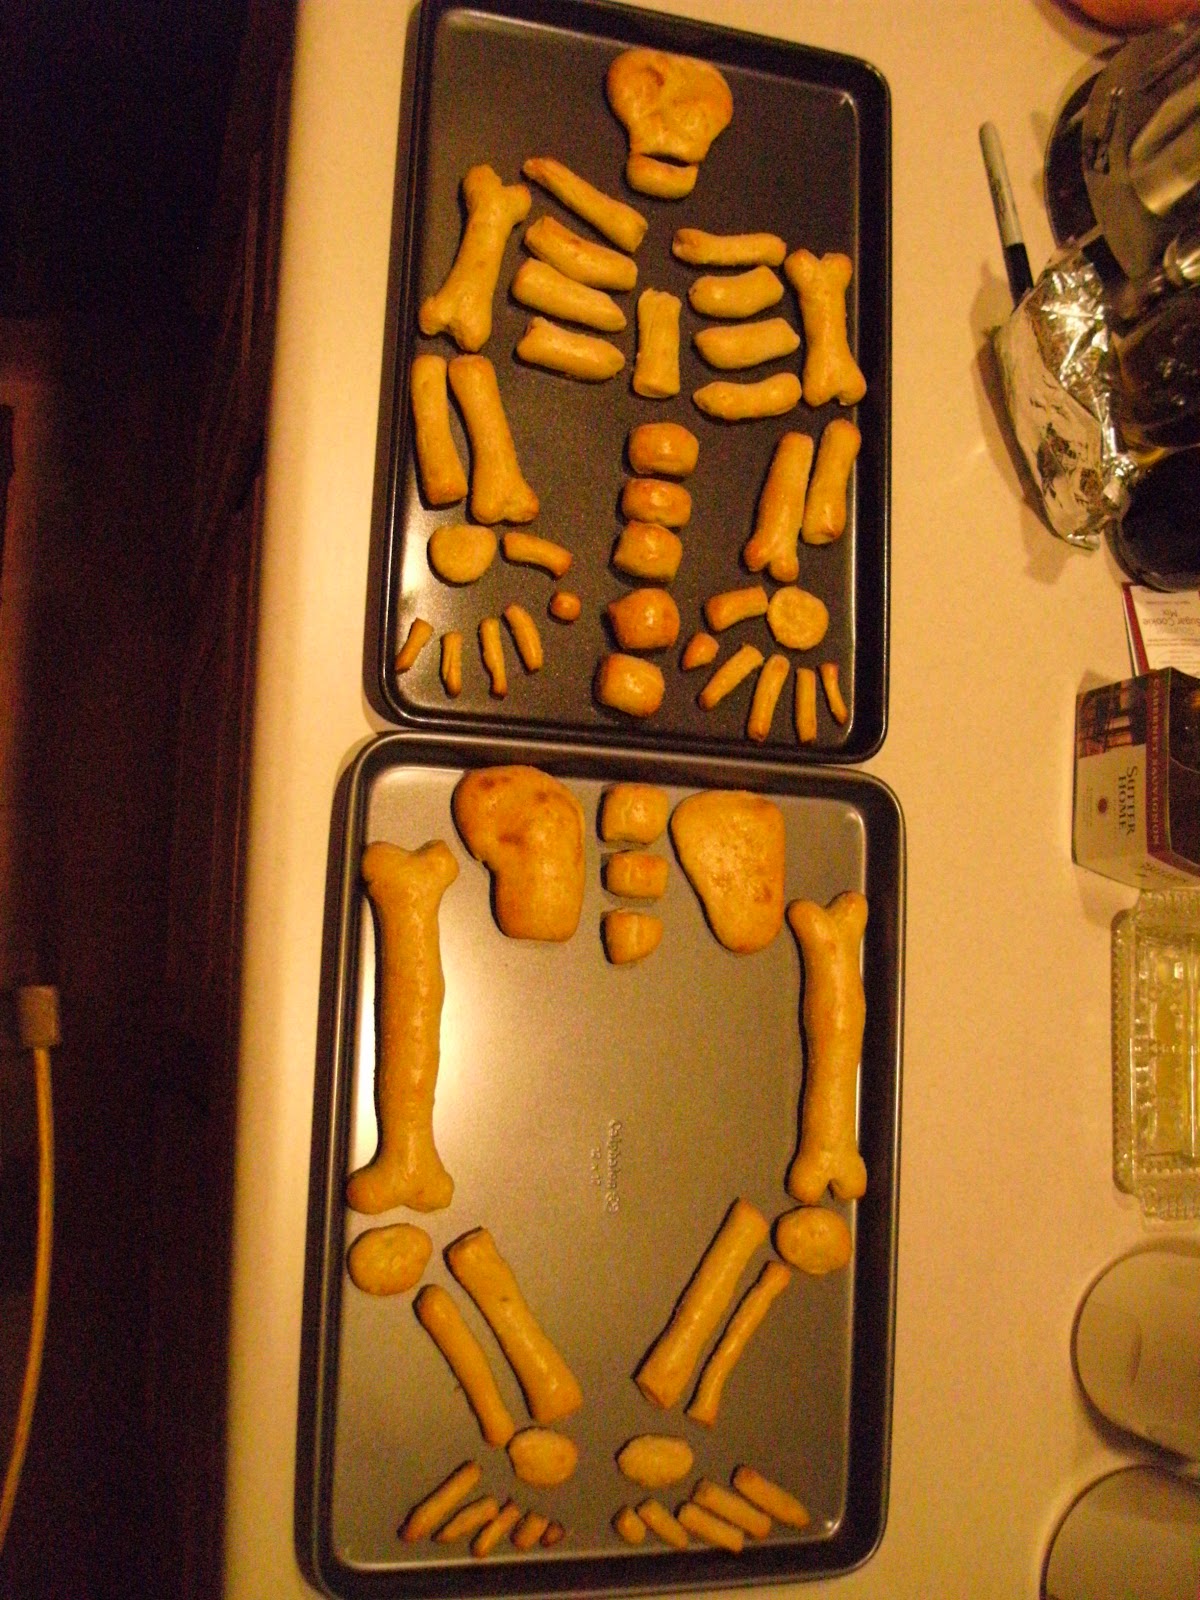
I used to be a massage therapist (seems like another life, really). In my course of study, I learned all the bones of the body. Well, I actually learned them in high school and then learned way MORE about them in massage school, but that makes me sound like too much of a nerd... So when hubby came home a few weeks ago and asked if I could make him a snack to take to his office Halloween party, I immediately longed for an anatomically correct skeleton. I am so tired of seeing incorrectly formed skeletons casually on display. And I love eating and making soft pretzels. It seemed like a match made in heaven!
I am not a total idiot, and I know that I will have to make some compromises on the anatomical accuracy. For example, I am not going to make a hyoid bone. (Look it up.) Or a crapload of tarsals and carpals. No one would recognize them in dough form anyway... :-) But I can do better than the leg bone is connected to the other leg bone. The skeleton at least deserves to have a tibia and a fibula and a femur separated by a patella, right?
To make the skeleton somewhat proportional, Hubby and I looked up some art charts to see what the ratios are between body parts. We found that 8 heads is about right for height, and the shoulders are about 3 head heights across (although not anatomically correct, the 8 head height looks better to the human eye, so we ran with that. In reality its more like 6.5-7 heads, or so I read). We wanted to fit the skeleton on 2 large cookie sheets that were 16" long each, so we used 4" as our "head height" and then used that as the basis for everything else. I drew up a quick sketch of what the bones should look like so I had something to follow, and went to town on the pretzel dough!


Soft Pretzels
2 1/4 t yeast (one packet/envelope)
1 1/2 c water at about 110 degrees
1 t salt
1T sugar
4c flour
1 egg
coarse salt
extra flour for kneading and dusting
Combine yeast, water, salt, and sugar in a small bowl or measuring cup. Allow the yeast to activate (bubbles should form). Add yeast mixture to flour and knead. Add flour until dough is not sticky, but still is a little tacky. Knead until dough is silky. Put dough in a bowl or leave on counter, cover it with plastic wrap or a kitchen towel, and allow it to rest for 10-15 minutes. If you do not let the dough rest, it will be harder to roll out and will spring back on itself a LOT, so don't skip this step unless you want to fight with your shapes. It will puff up a little from the yeast, but knead it a little and it will deflate again.
For the regular bones, I rolled the dough into ropes and cut it up, then shaped it as I wanted. To roll the dough into ropes, start with your hands in the middle and roll them outwards away from one another. If the dough is not tacky, it will not stick to the counter and will not roll nicely. If this is the case, dampen your hands and continue to roll it. Make sure you do NOT flour the surface you are rolling on or it will not work, either. :-) My counter still had flour on it from kneading, so don't be confused!


Brush the pieces with egg, sprinkle with salt (if you want salt) and bake at 425 for 12-15 minutes. You may want to bake the larger bones together and the smaller bones together on separate sheets and then rearrange them later, so you do not over or underbake certain ones. Keep in mind that your bones will puff a little in the oven so you may want to space them a little farther than you will in the fully assembled skeleton, and you may want to adjust your dough shapes to make sure the puffing doesn't affect the overall look.
I wanted to make a spicy cheese dip to go with this, but I was too sick this weekend to mess with it. I am sending hubby with mustard instead. All in all, this took a whole afternoon, but it was totally worth it because it was so fun and looked so cool! We had a bit of dough left, so I baked that up and snacked on it while making dinner.
Of course, you could just make pretzels and forget the whole skeleton thing... They still taste just as good!
I am not a total idiot, and I know that I will have to make some compromises on the anatomical accuracy. For example, I am not going to make a hyoid bone. (Look it up.) Or a crapload of tarsals and carpals. No one would recognize them in dough form anyway... :-) But I can do better than the leg bone is connected to the other leg bone. The skeleton at least deserves to have a tibia and a fibula and a femur separated by a patella, right?
To make the skeleton somewhat proportional, Hubby and I looked up some art charts to see what the ratios are between body parts. We found that 8 heads is about right for height, and the shoulders are about 3 head heights across (although not anatomically correct, the 8 head height looks better to the human eye, so we ran with that. In reality its more like 6.5-7 heads, or so I read). We wanted to fit the skeleton on 2 large cookie sheets that were 16" long each, so we used 4" as our "head height" and then used that as the basis for everything else. I drew up a quick sketch of what the bones should look like so I had something to follow, and went to town on the pretzel dough!


 |
| my foot looks lame, but I ran out of room and can't really draw worth a darn... |
2 1/4 t yeast (one packet/envelope)
1 1/2 c water at about 110 degrees
1 t salt
1T sugar
4c flour
1 egg
coarse salt
extra flour for kneading and dusting
Combine yeast, water, salt, and sugar in a small bowl or measuring cup. Allow the yeast to activate (bubbles should form). Add yeast mixture to flour and knead. Add flour until dough is not sticky, but still is a little tacky. Knead until dough is silky. Put dough in a bowl or leave on counter, cover it with plastic wrap or a kitchen towel, and allow it to rest for 10-15 minutes. If you do not let the dough rest, it will be harder to roll out and will spring back on itself a LOT, so don't skip this step unless you want to fight with your shapes. It will puff up a little from the yeast, but knead it a little and it will deflate again.
 |
| Kneading dough is therapeutic! |


Some of the bones, like the femur and humerus, I left very thick and created knobby "dog bone" ends by splitting the ends with a knife about 1 cm in and shaping each bit into a knobby ball. The other bones I made of varying thicknesses as was appropriate and shaped them as needed. Tip: use a butter knife to cut off the tapered ends after you roll the dough into ropes to keep more uniform thickness to your pieces.
For the solid bones of the hip and skull, I rolled the dough out with a rolling pin and cut out the shape with a butter knife. Once it was on the cookie sheet I smoothed the shapes a little with my hands.
 |
| I traced one hip bone to make the other so they looked kind of symmetrical. |
 |
For the patella, the "carpals" and "tarsals" I pulled a piece of dough out, rolled it in my hands, and flattened it into an appropriately shaped disc.
|
 |
| most of the upper skeleton and the hips |
 |
| hands! |
 |
| feet... only marginally better than my drawing... if even that. |
 |
| Much puffier now than before baking. But much more beautifully golden! |
 |
| Originally I wanted the hips on the top sheet, but the hands took up too much space so I added some vertebrae and moved it to the bottom. The feet STILL look lame. Oh well. I tried. |
Of course, you could just make pretzels and forget the whole skeleton thing... They still taste just as good!
Subscribe to:
Posts (Atom)