Showing posts with label fabric. Show all posts

Monday, February 24, 2014

Reusable Nursing pads

This is a super old project that I never posted on because, well, let's just say I am busy...  Hence the not posting for 7 months.  Oops.  Anywho, I loved these little lifesavers and they saved me a bundle since I didn't have to buy nursing pads for the year and couple months that I breastfed.


My breast feeding experience included a lot of leaking. My milk supply is shall we say... Ample. To give you a nice TMI, if I didn't nurse or express frequently enough, I was likely to shoot your eye out. As a result I burned through breast pads pretty quickly. I didn't want to use disposables since I was trying to be eco friendly, and the reusable pads I found didn't quite work.  The store bought ones were itchy, the handmade ones seemed really expensive, and ones that didn't have the drawbacks above couldn't dried in a dryer.  I laugh thinking about hanging up or laying out billions of tiny little fabric rounds.  People already thought they were coasters all the time.  So not working for me.

So, of course, I decided to make my own. I made some burp cloths and swaddle blankets so I had lots of scrap flannel lying around. I didn't trust layers of flannel to be absorbent enough so I cut up towels to layer between two pretty flannel pieces.

Reusable Nursing Pads

1) Make a cardboard template. Find a circle to use, like a coaster (haha) or bowl, or draw one with a compass (or use the string and a pin method). Mine was about 4" in diameter although a bit bigger might be nice for larger breasted mommies.  I am rather small busted, so adjust as you see fit.

2) Use your template to trace circles on your flannel and your old towel.  You can use a sharpie for this as you will be cutting them out, and if you have a serger, you will be trimming off the ends. For each pair you need 4 flannel circles for the outside and 2 terry cloth (towel) circles for the absorbent layer.

3) Cut out the circles and stack them up flannel, towel, flannel. Make sure the pretty side of the flannel is facing out.  Line up the edges the best you can.

4) Serge the edges, going slowly enough to keep the round shape and all the layers even. Make sure the layers don't bunch. If bunching is a problem, baste the layers together in an x before serging. This should help.  If you don't own a serger, you can turn and top stitch.  It will take longer, but is still really cheap and easy!


Some people say to use PUL (a waterproof material) for the backing. I'm a little afraid to use waterproof material because it's not breathable and can encourage yeast growth which causes thrush.

Don't want to make them yourself?  Check out my Etsy shop to buy a few pairs!

Wednesday, February 20, 2013

Wazoodle

I like great companies. I love small businesses. I feel good about buying US made. I like crafting supplies. I seek out good prices. I demand good customer service. I am impressed by sincerity.


Dear reader, this may not interest you in the least, but I felt obligated to tell you about the new and improved wazoodle. It's a website that sells cloth diapering and other supplies to the general public. Let me take a moment to disclaim: I don't work for them I get no money from them and I get no stuff from them unless I pay for it. Which I do. And will continue to.

Anyway, if you are into making your own cloth diapers or accessories, you may have heard of them. They used to be a Canadian based company, but after scathing reviews because of poor customer service and slower than slow shipping, they went up for sale. It is now run out if New Jersey and the new owners seem so awesome! They have scads of new products, all made by the same factories to keep the product quality high (that was the one good thing about the old wazoodle), but such a better attitude. The prices are great, shipping is much more affordable, and I don't have to feel guilty buying from a foreign company (business? In NJ. Products? Manufactured in the states. Yay!)

I get my PUL there, barrel stoppers, drawstring cord, and various other items. They have a great selection of organic fabric, including tons of bamboo.  It is a great resource for natural diapering options, especially.  Looks like they are carrying KAM plastic snaps and presses, too. I used KAMsnaps.com for that, but who knows?! I may switch! Anyway, this may not affect you at all, but I felt moved to shout to the world that a crappy supplier of great products is now a customer friendly, US company. They deserve a second chance. My newest order is placed. Hooray!

Tuesday, July 3, 2012

Baby Ren Faire Costume Continues

A while back I shared some of my research on period appropriate renaissance faire costumes for children, specifically babies. I am really just doing my best guessing here as I am neither a historian nor an anthropologist, so don't come back and say how wrong I am.  This is just what I have been able to gather together, so yeah... Don't hate :-)  Anyway, disclaimers aside, I finally got started last night!  Its only been 4 months since my first post on that.  Sigh, lag time sucks. But I found a pattern I could adapt, and while this is not exactly what I had in my head, its what I can reasonably make in 2 weeks knowing that it will probably be worn twice at the most.  So I made some concessions on fancy-ness and decided to do something a bit more "mini me" since my husband really liked the idea of our son in the same fabric as him.


I had simplicity 5813 from a baptismal outfit I made for our godson, and I figured it would be perfect for adapting to the ren faire vibe.  I am using the dress (A/B) along with the slip which can be seen in the line art - the sleeveless thing, as well as the cap without a brim.  I am using the dress pattern as the gown and the slip pattern as the shift.  Of course, I had to make a lot of changes to make it period appropriate.

For starters, the dress opens in the back, but I wanted a Spanish surcoat sort of look for whatever reason, so I decided to make it open in the front and closed in the back.  This also follows my husband's doublet style, making it match him that much more. I decided to go with loops for the buttons in the front rather than making a placket, again to match my husband's doublet.  I also wanted long sleeves for the gown, but I decided to make them of another fabric and make them detachable since we are having such an awful heat wave here in Wisconsin.  I also cut the front and back of the bodice twice since I am leaving off the collar and need a way to finish the neck and armhole edges.  I will make one cut the facing and the other the fabric.  If this gets too thick, I may find a lighter fabric to line it, but for now, that's the idea.  For the shift, I decided to keep the extravagant length so it could be worn in future years, since our son cannot walk or crawl yet anyway and it is unlikely to bother him much.  It may be a pain to carry him with all that fabric hanging around, but its my own fault!  I also had to add sleeves to this, so I borrowed the sleeve pattern from the sweater and hopefully it will work out okay.  For the hems, I think I may take up some of the excess with the idea that it can be let down later.  I may not since he isn't crawling or walking like I said, but if it seems like WAY too much fabric, I have options at least.

Now for the I hopes.  I HOPE to make the sleeves detachable, but I also hope to make the sides and shoulders adjustable so he can wear this next year.  I am thinking that I will add eyelets to them both and leave a little pleat of slack in the side of the skirt so when cinched up tight you can't tell, but leave that bit of room to make it adjustable in the future.  It will only be adjustable to a point, of course, but it at least gives me the hope that this can be worn more than once!

Well, that is as far as I have gotten as of today, but I will keep you posted on how it turns out!  And I will learn from my mistakes at Easter and have frequent fittings with the model!

my heap of pattern pieces all cut out.  If little man takes a nap, I know what I am doing this afternoon!


Saturday, June 30, 2012

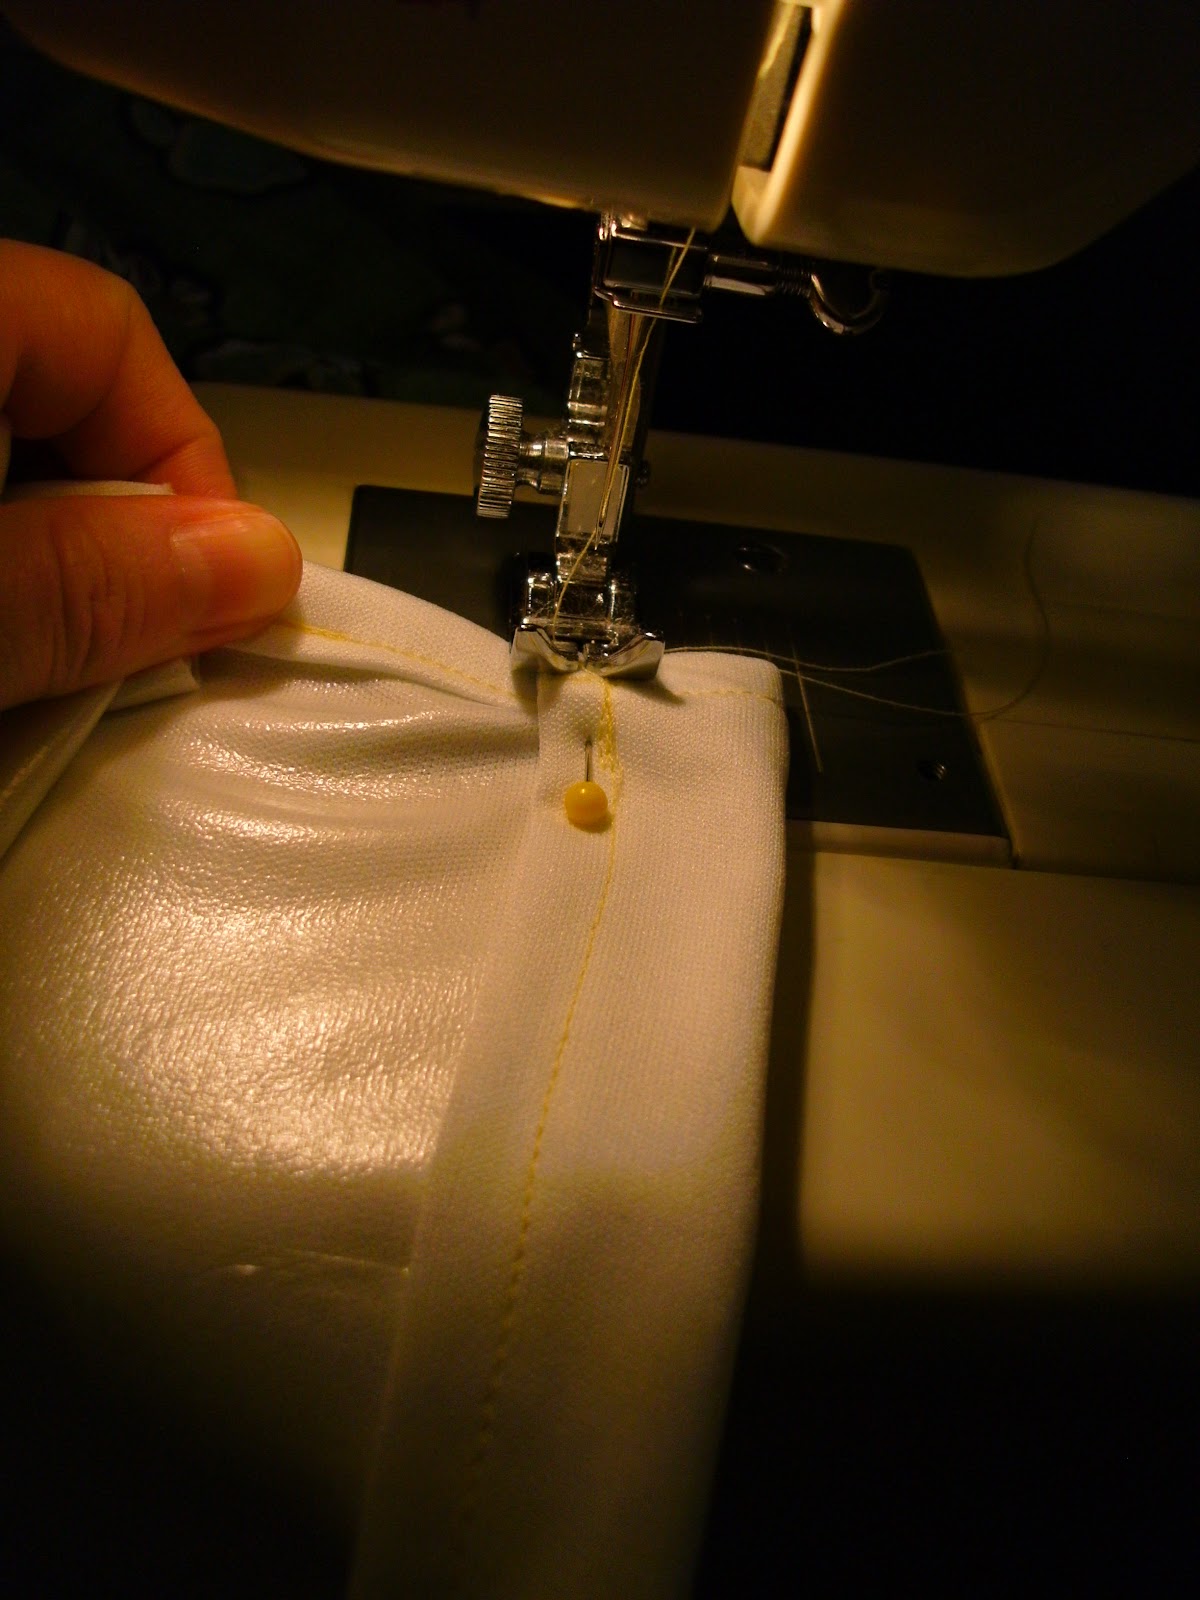
Taping your presser foot to sew on PUL

I love Pinterest.  It is an amazing way to share and bookmark ideas.  Or I should say, that is what it is at its best.  Its also another way to spam me, annoy me with pointless and meaningless sayings and memes, and waste my time with things that aren't helpful or useful.  But with a little concerted effort, its a great way to share and and find revolutionary ideas.  Well, this may not be exactly revolutionary, but man did it help me out tonight.

A long time ago in a blog post far far away, I made a diaper pail liner using PUL as well as a wet bag.  PUL is difficult to sew on because it is a plastic-y, sticky material.  The presser foot snags on the fabric rather than gliding over it, creating an endless source of problems ranging from puckers in the stitching, missed stitches, bunched stitches, bent and broken needles, messed up timing, and even damage to your machine.  A way to avoid having this problem is to place something between the presser foot and the fabric, such as tissue paper, or even regular old printer paper.  While this really does help, it doesn't completely fix the problem and can open a whole multitude of its own issues, like getting it torn off and all those little bits stuck under the thread out without damaging your stitching, loose stitches because of the extra material being sewn over, and not being able to see the line you are stitching very clearly.

Enter Pinterest.

I saw a pin about a trick for sewing on vinyl and thought I would give it a try with PUL.  My foray into sewing stuff for my son's cloth diapers led me to use Joann's PUL which met with mixed results.  I had to replace some of the items I made after the PUL self destructed, but other items made with a different bolt of fabric is still going strong!  Anyway, This method recommended taking a small piece of scotch tape and taping the bottom of your presser foot to make it slippery.  I was pretty skeptical, but I figured I would do half the new project with paper and compare the experience and the stitching to the tape.  You do have to make a hole for the needle to avoid gunking up your needle and subsequently your machine and make a slit down the middle in the front for the thread to slide through, but it worked pretty darn well!  The presser foot slid nicely over the fabric, with only a fraction of the friction.  WORLDS BETTER than using paper or tissue paper or any other method I have found thus far.

So now we know.  Scotch tape for sewing on sticky fabrics works! Not only do you not have to deal with paper, you can see what you are doing and it leaves your hands free for removing pins, keeping your fabric aligned, and all those other things you do NORMALLY.  Go Pinterest.

Monday, March 5, 2012

Diaper Pail Liner Revisited - the PUL version

Okay, so ripstop wasn't awesome.  So I revisited my design knowing that there are upsides and downsides to working with PUL.  I used only 16.5" of 60" wide PUL and folded the length in half and stitched up the sides so there wasn't a bottom seam to seep through.  I also enclosed my side seams to avoid the same.  Hopefully its not just a lot of effort that wont make any difference... sigh.  I never know when I am being clever and when I am just being overly complicated.  :-(

Diaper pail liner - PUL version

Materials:
16.5" of 60" wide PUL
Thread
Sewing machine
Scissors
~ 45" of cord or shoelace for the drawstring

Step 1: Fold the PUL in half, folding selvage edge to meet selvage edge, with the laminated side (shiny, rubbery side) together.  Pin the sides together close to the edges.  Measure about 4" down from the open side and pin.  Stitch sides together below the pins, a scant 1/4" from the cut edge.


Step 2:  Turn the bag inside out (laminated side out).  Turn the corners and stitched edges very well.  To encase your seams, stitch along the sides about 1/2" from the edge, making sure the 1/4" seam allowance stays between your line of stitching and the outside edge.  NOTE: Only stitch below that 4" line from the top of the bag. :-)

Step 3:  You should now have an awkward tab at the top, above that 4" pin you put in oh so long ago.  CAREFULLY clip the fabric to the seam line.  I accidentally clipped too far on one side (easy to do when rushing) and now I have a weak spot that may tear over time.  Boo...

Doing it right the second time... too late to save the first side.
Step 4: Now to finish that top 4 inches.  Fold the cut edge of the fabric to the seam line, laminated sides together.  Fold again, enclosing the raw edge.  Stitch, keeping close to the inside edge of the fold.


Step 5:  Turn under and stitch 1/4" of the top edge of the bag, laminated sides together.  Be careful at the sides that you just finished, as the PUL can get bulky and make the stitching slip.  Repeat with the other side.


Step 6:  Turn the newly finished top edge of the bag over 1" toward the laminated side, or as much as you need to fit your drawstring.  Stitch close to the finished edge to create a casing.  Repeat on the other side.


Step 6:  Almost there!  Now to add width to the bag - note that this is the same as with the ripstop bag.  Refer to that post for more explanation if this step seems tricky.  Laminated side out, crease the bottom edge of the bag.  Place in a pin or two along that crease.  Match the side seam up with the line created by the pins and pull the front and back sides of the bag out, creating a triangle shape.  Measure three inches from the point of the triangle (the corner of the bag) and place a line of pins across to make the bottom of the triangle.
holding the bottom edge of the bag
turn the bag sideways so the bottom edge of the bag is up
place pins in 3" down to create the bottom of the triangle
Stitch across that bottom line of pins.  Repeat on the opposite corner.  The bottom of your bag should look like this:
It now has wings!!!  and with no red bull... sorry, i am sleep deprived :-)

Step 7:  Thread your drawstring through the casing you made on both sides of the bag.  Gather the loose ends on one side and knot them securely.  You are Finished!

Bottom Line:
~1/2 yard of PUL - $5
45" of cord - about $1.50?  
Total cost = $6.50

Time = ~1.5 hours, maybe more if you have to fight with the PUL... boo.

Retail cost:=$15 for a 2 pack of disposable liner refills, $16-20 for a reusable liner

Total savings: $10-15 for a reusable liner, or ~$320 over the life of the bag for disposable liners

A few things to consider when using PUL... if the laminated side is not feeding through your machine, wrap tissue paper around the seam (top and bottom, or at least on the bottom) and then tear it off once you sew your seam.  The paper makes it slide easier, but will not make extra space between your stitches.  Also, PUL is like other plastic and rubberized fabrics.  Pin holes stay there.  Some say that a run in a hot dryer will seal up those holes, but its agreed that making less in the first place is ideal.  I know I say to use pins a lot in my post, but in my pictures, you will note that my use is minimal, and often within seam allowances where it will not affect the integrity of the waterproof layer.  Back to the dryer bit... as with all fabrics, quality of PUL varies greatly, and consequently so do the care instructions.  Some people swear that PUL is fine in the dryer, regardless, and others say line dry only unless you want to destroy your item, regardless.  I say, play it safe and machine dry only when necessary (ie: you have nowhere to put your dirty diapers unless it gets dry pronto!).  It hangs dry pretty fast, so this shouldn't be too much of an inconvenience.  Hope this post helps.

Oh, and for the record, my ripstop bag was still in use up until last night when I finished this bag, and while it did seep some liquid into the bottom of the can, it wasn't terrible.  I wonder if better ripstop really would work??

Update: I now have wet bags and pail liners for sale in my Etsy shop.

Wednesday, November 16, 2011

Ordering fabrics and craft supplies online

This is not a how-to post, I know, but I feel like crafters everywhere are struggling with the move to web based shopping.  I know it is something that plagues me.  I have so many items I need for many of my projects, and inevitably, something is out of stock.  Brick and mortar stores used to be the only option, and getting rare or large quantity items was basically impossible.  Well, that is not the case so much with the interwebs, but what things are good to buy online and what things aren't?  Is it okay to buy cut yards, sight unseen?  What about trying to save money?  What if I hate what I have ordered?  What about coupons, sales, etc?  So many questions...  I have tried to tackle some of that here, and most of what I say applies to fabric specifically, but applies to other craft supplies, too.

Delving into the true unknown: internet based retailers.  There are lots of different flavors out there from amazon and ebay sellers that might actually be that crazy lady down the street selling the crap in her garage to true internet-only retailers without a store counterpart, to the website of common chains like Joann's.  Each handles things a little differently, and it is hard to lump them together, but I will do my best to represent all the above.

Pros:
1) Selection and availability.  There are so many options out there for things like fabric, where the quantity of items produced could never possibly be held in a store.  There are specialty fabrics made out of organic cotton, bamboo, and unbleached or untreated fibers, a variety of prints that would swamp any normal retailer, and uncommonly used notions like hook and eye tape, which I discovered a few months ago is basically unfindable.  I love the selection on the internet.  You can find darn near anything!

2) Cost.  Shopping around can really pay off.  Because they do not have the overhead of a brick and mortar store or the hassle of distributors (if you are buying wholesale), online shops can be a whole lot cheaper, and it is so easy to let your keyboard do the shopping.  Especially when you consider buying bulk (usually by the bolt or in large quantities of cut yards), the cost of fabric can come down substantially compared to in store purchases.  Many chain stores run the same sales online as in store, and you can capitalize on that, too.  Also, you can buy things on clearance at drastically reduced prices as they clear warehouses of a particular item that a manufacturer is no longer making or has a defect (usually a minor thing like selvages are messed up or something you can still use).  I have done this several times and been SO glad for it!

3) Quantity.  For large projects, finding an adequate amount of fabric is tough in stores.  Bolts are small, generally under 10 yards each, and rarely do you find a brand new bolt.  But online, you can find large, CONTINUOUS bolts of fabric that don't leave you with 9 yards in one piece and three in another.  I wanted to make 5 bridesmaids dresses.  I ended up getting the fabric at 7 Joann's locations over 4 months of time.  An online purchase of a few bolts of fabric would have been VASTLY easier, if only I had known then what I know now.

Cons:
1) Untouchables.  The most obvious drawback to buying anything online is that you cannot see what you are buying.  This is a major downfall for creative types.  Imagine trying to compare two pieces of lace trim without having them in front of you or being able to lay them across the fabric you are working with?  Tough call.  Many retailers (ones without a brick and mortar store in particular) do a great job combating this with item descriptions and photos, giving examples of projects that are suitable for that kind of fabric and showing a scale when displaying prints to give the buyer an idea of what it looks like in person.  Some even describe the drape and feel of the fabric and/or include a thread count or gram weight when referring to the fabrics.  A select few offer free swatches, and many others offer swatches for a fee that usually includes shipping cost, generally about $1 or so each.

2) Shipping.  Shipping costs can often eat up any sale or price incentive you found to buying online.  Because fabric is both bulky and heavy, it can be a bear to ship.  Some stores offer free shipping for orders over a certain dollar amount or flat rate shipping promotions, but that forces the shoppers hand on how much to buy and when, and if you want to take advantage of something on sale or clearance, well that pretty much NEVER lines up with a free shipping deal.  Also, the ecological impact of shipping has been cited many times in the argument for buying locally.  Now if it isn't manufactured locally, well, that kind of opens a whole new can of worms, but I am not really willing to get into that here... :-)  And of course, if it has to be shipped, you cannot have it immediately for a short deadline.

3) Couponing and promo codes.  Remember the crafter's creed, Never Pay Full Price!  Some stores never offer sales or coupons (most notably for me, dharma trading co.) which means you can never bring down your materials cost.  Others (like joann.com) only allow one coupon or promo code per transaction, which means you can't use a free shipping code with a percent off code.  What gives?!

4) Yardage increments.  Most sellers online will not sell less than 1 yard, and will only cut in increments of 1 yd.  This is hardly an issue for me, since garments almost always use more than 1 yd, but sometimes getting 6 instead of 5 1/8 is a little annoying, especially for those REALLY expensive items like faux furs or silks.  I am sure this is horrible for quilters, though, who commonly need only a fat quarter of something for a project.

5) Returns.  What do I do if I hate it?  Probably the scariest con when combined with #1, not being able to touch the item before you buy.  Return policies vary widely from store to store, as does the quality of the merchandise.  The biggest problem I have with returns is that the .com affiliates of the brick and mortar stores are actually separate entities entirely and I cannot return items to a store (such as joann's and joann.com).  That yanks the security net right out from under me.  (Why they chose that business model is beyond me).  I recently bought from hancockfabrics.com and they sent me 4 yards of defective flannel.  Even though it was their fault the fabric was defective, I had to pay shipping if I wanted to return it.  Shipping was around $11, and the cost of the fabric was about $14, so I opted to keep it so I didn't have to spend $11 and still have no fabric for my project.  I'm certainly not happy with the return policy there!


Bottom line: Buying craft supplies online is a great way to save money, price compare, and find exactly what you are looking for.  However, protect yourself the best you can as a consumer.

1) Do copious research on their return policies BEFORE you buy.  Some will not accept returns at all (especially for cut yardage), some will under certain circumstances but you pay shipping, some are great about returning items, and there is every other shade of grey in between.

2) Have a good idea of what you want before you buy, and if you can, scope it out in person somewhere.  If you are unsure about the look and feel or drape of a fabric, try going to a store and handling similar items.  You can always order a swatch, but make sure you allow yourself enough time to have the swatch shipped and then order the item.  And keep in mind that dye lots may change the appearance slightly from the swatch you receive.

3) Sign up for email coupons for chain stores and newsletters for the online-only retailers to keep up on sales and shipping promotions as well as new products.  Always take a look at the clearance bin before you place your order - you just may find something to love.

4) Only buy from reputable sources you trust.  There are lots of shops out there on the interwebs and not all of them are good.  If a site is questionable, place a small order to "try them out" before going $300 deep on that gorgeous satin you think you want.  Try not to learn costly lessons if you can avoid them!

Happy online shopping!

Monday, October 3, 2011

Simple curtain panel with hanging tabs

I know I have been doing lots of baby stuff lately.  I promise I will not keep it up forever, but I make what I need for my life as it comes... So bear with me :-).  To offer a gesture of good faith, here is a post on making curtains.  Not baby-specific curtains (yay), but a general curtain panel.  This can be adapted to a shower curtain or in this case, a cover for a closet.  Backstory: a friend in med school recently moved into an ADORABLE little place to do her internship, but it is just that.  Little.  To get her dresser in her room, she had to remove the closet door (or just never use her closet. Umm, no).  Since then she has had this gaping hole in front of the closet, and being a med student/intern, lets just say she doesn't want to waste a lot of time making sure her CLOSET of all things is presentable.  So, she asked me to make a plain little cover she can hang from a tension rod.  Granted, that was like 2 months ago, but hey, I'm a procrastinator.  The fact it got done at all is a near miracle.

Warning: the instructions are quite lengthy.  You may want to read through them all before starting to make sure you understand completely!

Curtain panel with tabs for hanging:
This style of curtain panel uses tabs for hanging.  If you prefer to make a casing and scrunch the fabric over the rod, make the top like the bottom and be sure to add enough length to accommodate the wider hem.

What you need:

  • Enough fabric for your window (add a little length for hems and seam allowances, but the width should be at least double to make it hang nicely and give that cute bunchy look)  Make sure you have washed and dried it ahead of time so your project doesn't shrink or warp.
  • cloth belting or extra fabric to make tabs
  • sewing machine
Step 1: Cut the panel from the piece of material you are using.  Try to get the edges as straight as possible.  This will make hemming easier.


Step 2: Press up the raw edge on the "bottom" of the panel.  Press up another 1 1/2" or so to make a nice wide hem.
Pressing up about 1/2" of raw edge.


Step 3: Press in the raw edges of the sides (I used the full width of the fabric and had to deal with hiding the ugly selvage edge so I pressed in 5/8" which is way more than normal.  I would stick to 1/4"-1/2" normally).  Press in another 5/8" or so to enclose the raw edge.  NOTE: the finishing of edges can be done with a serger, but for this project I much prefer the look of fully hemmed edges.
SO much selvage to hide.  Ick.

Step 4: Stitch the side edges of the panel close to the inside edge.  

When you get close to the bottom edge, fold under the raw edge along the pressing mark and tuck it in so you sew over the folded piece and the end is now enclosed.  You can skip this step if you like, but it will keep any threads from escaping and makes the final product look more "finished".  This is especially important with thin materials like chiffon, organza, or light breezy cottons that could fray in the wash.
Stop stitching and lift the presser foot with the needle all the way down when you get to the first pressed mark.
Tuck up the section of raw edge you pressed up.

Fold it under the presser foot along the whole length of the bottom.  You will stitch through all thicknesses.

It should look like this when done correctly.
Step 5: Stitch the bottom hem of the panel close to the top fold.  This will leave open sides which you can choose to sew shut or leave open.  The choice is purely cosmetic and is up to you.  I left mine open.


Step 6: Press up the raw edge of the top of the panel.  Press up another 5/8" or so to match the width of the sides.  


Leave sides open to accommodate the curtain rod
NOTE: If you do not want to use tabs to hang your curtain, press up enough fabric to go over the rod. This will depend on the diameter of the rod.  Measure around the circumference of the pole and divide that number in half.  Add extra for ease and for seam allowance.  Press up that measurement and finish as you did the bottom hem. Alternately, you can enclose the raw edge before making the casing (press up a small amount once more and stitch across before pressing up the casing).  This is important if using a fabric that ravels easily.  You are now done and may disregard the rest of the instructions.


Step 7: Decide how many hanging tabs you would like.  For the tabs, I used Wright's belting, I think.  It was an open package without a label, but was just a flat piece of trim with no decorations or folds in it (seemed like belting to me, but really soft like cotton instead of polyester nastiness I think of when I think belting.  I don't pretend to know everything, and the names of notions is one of those things that escape me constantly).  You could also use double fold bias tape or seam binding as long as you enclose the raw edges with a line of stitching first.  You could also use grosgrain ribbon or some other sturdy type of ribbon.  Just pick something strong enough to handle sliding and being in the sun!  I used 7 for my 40" ish wide panel.  Decide how long you would like the tabs to be, based on the diameter of the hanging rod and how low you want the curtain to hang.  Add 2" to that measurement and cut the number of tabs desired. 


NOTE: If you want to make tabs from fabric, cut a strip of fabric twice as wide as you want the tabs and long enough to cut all the tabs.  You may need 2 strips to get the necessary length.  Press the strip in half with wrong sides together.  Open up the fold and press the long raw edges in to the center fold mark, again, with wrong sides together.  Refold the first fold, enclosing those raw edges and stitch along both long sides of the strip.  You only have to stitch the open side to encase everything, but for strength and to prevent stretching and warping, I do both.  Cut your tabs to the appropriate length.


Step 8: Pin the top of the curtain where you want your tabs so they are evenly spaced.  This can be some tricky math depending on the width of your curtain (measure it - you lost a little width with hem allowances) and how many tabs you chose to use.  If you are using 7 as I did, here is the no-math method I used to evenly space the tabs.  I used one for each end (easy enough to find), then folded the curtain in half and pinned the center.  I then took one side and folded the edge in about 1/3 of the way to the center pin and then folded it over again, the rest of the way to the center pin.  By tugging, you can get an even thirds fold.  Pin both thirds marks.  Fold the curtain in half again, and use the same thirds marks on the other side.  Voila! 7 tab markings!
One
Two

Three!
Step 8: Open up the hem on the top of the curtain and at each marking, pin a tab.  The raw ends of the tab should face in to the fold, and the loop of the tab should be sticking out beyond the fabric edge.

Stitch over the ends of the tabs to hold them in place.

Sew the top hem for the curtain.  "Oh no!" you say.  "My tabs are now sticking down. How awful!"  Before you reach for the seam ripper, read on.  This is how it is supposed to go. :-)


Step 9: For each tab, do the following:


a) Fold the tab up so the loop extends beyond the edge of the curtain.  Make sure it is going straight up and not at an angle.  Press if necessary/desired.  


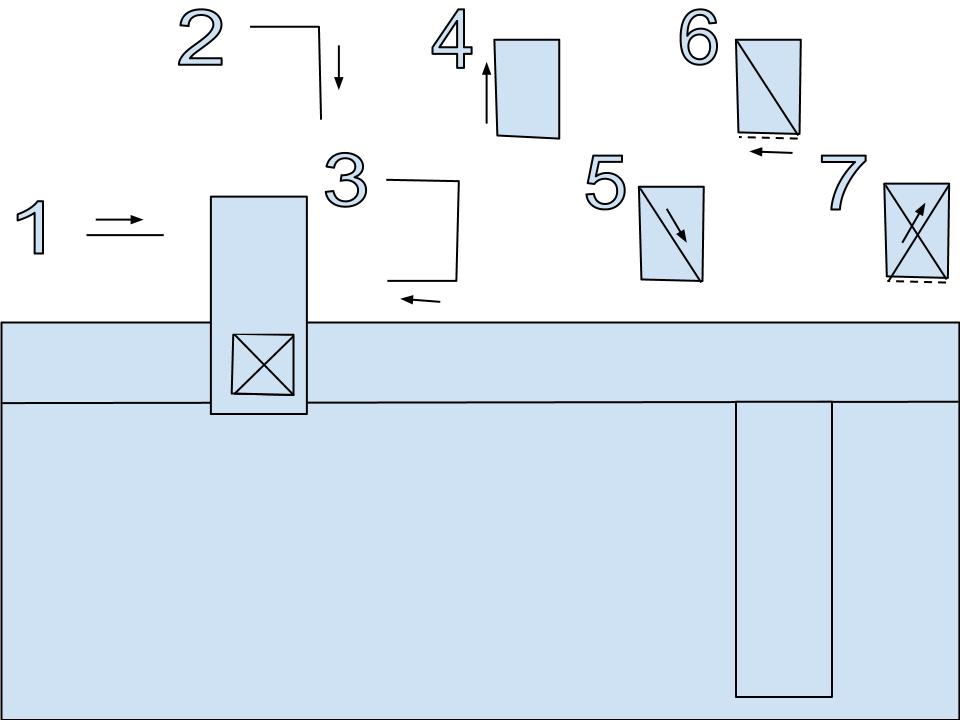
b) To reinforce each tab, stitch a rectangle with an x in it inside the tab part that is in the hem allowance.  I call this a "barn door" because it looks like the x on a barn door to me. Stitch across the top of the tab, down the side, across the bottom, up the side, diagonally to the bottom corner, across the bottom again, and diagonally to the top and off the fabric (see illustration).  Do all this without breaking stitching.  To avoid breaking stitching, when you get close to the end of a line of stitching, use the hand wheel to advance the needle all the way down in the last stitch.  Lift the presser foot and rotate the fabric to stitch the next line.  Put the presser foot back down and stitch the line. At the end of that line, repeat the process.  Be sure to keep excess fabric out of the way of the needle.  Remember that you can rotate the fabric in any direction.  Sounds silly, but I catch myself doing it all the time and bunching up the fabric for no reason!   

c) Clip the thread ends and move on to the next tab.  When all tabs are complete, you are done!

You are now finished!  Your tabs are reinforced and strong and should not rip out of the fabric this way.  It may seem like a little overkill, and it kind of is, but I am obsessed with the durability of things I make and I hate repairing items.  Just ask Hubby.  I have a whole box of things that need mending that have been sitting there for months.  Okay, years.  Some only need a button sewn on.  Seriously.  The lazy crafter that I am...  

Anyway, there you have it!  A simple yet elegant solution to all your window covering needs (and shower curtains and closet covers).  And all it costs is the yardage of fabric.  The one I made came from bargain bin stuff at Walmart.  You know, the 5 yds for $5 bolts of stuff?  Yeah.  Nasty to wear, great to curtain with!  I think this thing cost me $2 to make.  Wow....

One last note - if you really are making a shower curtain, consider not using tabs.  Instead, finish the top edge with a wide hem and put in large eyelets.  That way you can clip it on to your shower curtain rings along with the liner.  Hmm... another how to perhaps... Happy Sewing!

Friday, September 2, 2011

Bassinet/crib sheets and changing table covers

I finally did it!  I completed my first baby project(s)!  Hooray!  My husband is on a man's camping trip this week which left me with a wide open schedule - no making dinners for him, no extra dishes to wash, no real need to make the bed (hehe oops - my laziness kicked in, I'll admit).  So, I ended up with lots of time to focus, which is critical when doing something I have never attempted before, and so, the baby projects began!

A few months ago I bought a used crib on Craigslist that has an attached changing table, similar to this:


Since the changing table is only as long as the crib is wide, it is a nonstandard size.  It came with the changing table pad, but the seller had lost the cover, so I was SOL.  I decided to make them myself.

We also bought an Arm's Reach Mini Bassinet/Cosleeper. (craigslist too, of course.)

This nifty little contraption looks and folds up like a small pack n play, and can be used with both sides up as a stand alone bassinet (travel anyone?) or with one side down strapped to your bed for a safe way to cosleep with your baby without losing space in your own bed, a necessity for us since we only have a full and I already fight for space at night!  However, the little sheets are really expensive at about $15 at target, and only come in boring colors like neutral and tan.  Ick.  Other people recommended using a king sized pillow case and then tucking in the long ends under the foot of the mattress, but I was less than enthusiastic about this half-cocked approach (which likely wouldn't get me a cute design, either).  So, I decided to make them myself.

At first I thought I would use the same basic "pattern" for both - make it like a fitted sheet.  However, after looking at the construction of the existing sheet for the cosleeper (thank goodness it came with at least the one), I decided to mimic that approach for it, and then do a normal "fitted sheet" thing for the changing table covers.  As usual, I neglected to take pictures during construction.  I will get better about that, I promise!

Usually when I decide to make something out of the blue, the project is much more complicated that I think and I somewhat regret it by the end.  This was NOT one of those projects.  It is just as easy and quick as it looks.  Hooray!

For this post I will focus on the "fitted sheet" pattern.  I will post the other when I make the second one so I can show photos... Otherwise its just too hard to explain.  Note that this "pattern" can be used to cover anything that is rectangular, so a crib sheet, a table cover, a seat cover, just about anything is fair game.

To begin, measure the item you are covering.  I will just refer to this as the mattress since that is what I used.  The top of my mattress was 22"x28".  Then measure the depth of the mattress.  Mine was about 1" deep.  Since the cover has to reach all the way around the mattress, add the depth times 2 to the length and width.  This would bring my measurements to 24"x30".  

Please excuse the crappy paint drawn diagram :-)

Next, I added a little bit of length so there was something to wrap around the bottom and "hang on" so the corners wouldn't always slip off.  We have a deep mattress on our bed and my biggest pet peeve is when the fitted sheet says it fits deep mattresses but only rolls over by like half an inch so its constantly popping off in the middle of the night.  ARGH!  So, I made my "cushion" for the backside very ample.  You can use your discretion about this according to the size of the item you are covering, as well as your own personal preference on the overlap needed to make it feel secure.  Keep in mind that a small amount of this extra will be used to finish the raw edge and encase the elastic, so add about 1/2-3/4" to accommodate that.  I decided to go with 3".  So, once again, you add 3" twice to the length and width measurements, bringing my total to 30"x36".  These measurements are the final dimensions of the piece of fabric we will need.  Since the amount of fabric you need will depend on the size of the item you are covering, do these measurements before you buy. :-)  Keep in mind that fabrics come in different widths which can help minimize the amount you will need, but how you cut the rectangle will affect which direction a pattern goes, so be aware; if you don't want stripes going a certain direction, you may need more fabric to accommodate.

Since I bought extra fabric for the Fauxby wraps that ended up not working out, I used some of that for this project.  Cut out your rectangle.  It helps to make multiple chalk marks on the fabric and use a straight edge to connect them and a carpenter's square (or a piece of cardboard with definitely square edges) to check your corners to make sure you are getting a rectangle instead of some other four sided polygon...  Right angles are tricky. :-)  

Next, take each corner and fold it in half, with right sides together (the wrong side of the fabric should be facing you), making a skinny triangle.

Step one
Step two

Add the measurement from the depth of the mattress and the measurement of the extra you added to warp around the back of the mattress.  In my example, it is 4" (1" mattress depth, plus 3" to wrap around).  From the tip of the triangle, mark that far down (4" in my example) on the rough edge of the fabric and stitch straight across the triangle at that line.

It's a little hard to see the stitching line, but it goes straight through the giraffe.


Zig zag or stitch close to your stitching line.  Trim the excess fabric above/outside the stitching line (closer to the tip of the triangle).  Alternately, use a serger instead of a sewing machine to stitch the line.  It trims for you :-)  Repeat this entire process for each corner.

Trim the excess down to about 1/4" or so.

Next you are ready to make the casing for the elastic.  Either serge the entire raw edge of the fabric, or press up about 1/4" all the way around.  Fold up the fabric by about 3/8-1/2" to create a casing for the elastic.  How much you press up will depend on the width of elastic you use.  It should be pretty thin, about 1/8-3/8", depending on the size of your project, but it is really up to you.  I used 1/4" elastic and pressed up about 1/2" and my casing was plenty wide.  Stitch the casing, leaving a small (1") opening to thread the elastic through.  Using a safety pin, thread the elastic through the casing.  Again, the length that you will need depends on your project size, as well as the elasticity (stretchiness) of your elastic.  I just used a really long piece of elastic and when I had threaded it through, I adjusted the gathers around the mattress to what I wanted and cut the length.  I am not really sure how long the piece was, so just go with what fits well for your project.  Making sure there are no kinks in the elastic, stitch the ends together securely.  Close up the opening in your casing, and you are done!  It should look something like this.


Put it on your mattress/item and revel in your amazingness!


Bottom Line:
Fabric: less than 1 yard @ $5/yd = $5
Elastic: less than 1 roll @ ~$2/roll = $2 (honestly, I used scrap materials from an old project so I hate adding this to my total cost.  I have had it for YEARS and not used it...)
Total cost = less than $7

Time = about 1 1/2 hours, give or take.

Retail = not available

Savings = well, in this case, priceless... I couldn't buy a changing table cover for this item!

Next up: the OTHER pattern for a bassinet sheet... ohhh ahhh....