Showing posts with label costumes. Show all posts

Saturday, July 20, 2013

Renaissance Fair time again

Yep.  Its that time of the year again.  I LOVE me some grown-up dress-up.  So what if I never outgrew being 5 and pretending I was a princess?

Years past I have posted random stuff really.  This year is no different.  I am making a peasant/middle class outfit for a friend's girlfriend (she is a friend too so I am not sure why I said it that way, but whatever.  My brain is worthless today).  I had a lot of fun picking out design ideas for her.  Here are the sketches of my initial designs:
This one was my fav, but it was too "upper class."  Darn. I really wanted to make it, too.

Don't know why my scanner beheaded these ones.  Guess my drawing leaves something to be desired.

She liked something along the lines of the drawing on the right from the second set of sketches.  So I am partway through the costume now.  I made the top (from a commercial pattern [Butterick 6196] with some tweaks, of course) and I made all but the clasp on the underskirt, although I made a mistake in my pattern and it will be a bit shorter than I wanted.  I made an 8 gore circle skirt out of triangles but forgot I had to remove some from the top for the waistband.  Oops.  So now its 5" shorter.  Still looks great. Next time I will use trapezoids.  Or make the triangles longer.

Pretty standard, really.
I have the design done for the overskirt, but haven't drafted the pattern yet.  All it will really involve is taking measurements and doing math.  Gross.  Since math went SO well for me on the underskirt.  Its a different style though, so it should be okay.  For this one I am doing a new (to me) technique that takes the waistband out of the center.  I have a skirt that does it.  Basically, you cut two huge semicircles (I'll be doing it with triangles to get the handkerchief hem) and stitch them together except for like 25" or whatever in the very center, and sew the waistband to the middle bit and put your elastic in there and BAM.  You have a SUPER easy skirt.

I will also be making a boned bodice.  That should be pretty straightforward and I plan to use the aforementioned Butterick pattern as my base.  I may make some modifications to the shoulders to add a little flair.  Not sure.  I also (time permitting) want to make a pouch and hairnet for her.  I saw a REALLY neat tutorial on Pinterest on how to make a hairnet, but its in German, so wish me luck.

Also, I made this last year and forgot to post photos.  I have NO idea how I made it anymore since, as with most things, I planned to write down the instructions later since I was too busy to do it as I was working, and now a year has gone by and I have completely forgotten.  I don't even have the finished piece anymore as it was commissioned and is now with its new owner (not that I can't call him up and ask for it back for a day, but still).  When will I ever learn?

An awesome cotton cross body pouch with adjustable strap.  YEAH!  And yes, that is a recycled belt buckle.
Other than a few repairs to my court dress after some abuse it took last year (mostly eyelets coming out... I need to get a proper riveting set) and maybe getting around to a pair of proper breeches for the hubs, I think that is it for this year.  I have not been sewing as much lately since my wedding veils have taken off, and it feels REALLY good to flex that creative muscle again.  Its funny how I binge and then hate sewing, then when I go back I can't remember why I got sick of it!  I'm slowly adding some stuff to my Etsy shop so maybe I can make sewing more a part of my everyday again.

Tuesday, September 18, 2012

Nerdy Halloween costumes for a family

Ahh it's that time of year again.  The only reason I will EVER look forward to fall is because of Halloween.  Well, maybe when kidlets are older I'll look forward to school starting, but for now, it's Halloween or bust.

And this year we have a new person to dress.  Much like Ren Faire this year, the thing I am looking forward to most is the costume for little man.  Sure, I am making something awesome for a friend of mine and I am working on a quilt/duvet cover I have been commissioned to make (and I am CLUELESS by the way), but the thing I am thinking about most is a cool costume for my son.  And of course, I want to go as a themed family unit, so now I am pondering the options for all three of us.  And I have GOT to start sooner this year so I am not making a costume right before we leave for the party like I did last year while preggers.  Although I have not completely made up my mind just yet, Hubby seems to really like the idea of little man going as Mario, so I think that is what will end up happening.  But here are some of our family themed ideas. WARNING!  They are incredibly nerdy, and most are video game related. :-)

(Order: Mother, father, baby/child)
Samus, Space pirate, Metroid larva (from Super Metroid) <-- My personal favorite
Zelda, Link, Young Link or Navi/fairy
Mrs. & Mr. Pac Man with a dot or a ghostie
Princess Peach, Mario, Toad
Princess Peach, Bowser, Koopa Kid/Bob-omb/Koopa
Maid, Butler, Child in frilly gown or mini tuxedo/suit
Wendy, Peter Pan, Lost Boy
Three nesting tetris blocks

These are only those I could remember off the top of my head.  I can't seem to find the piece of paper I wrote all my ideas down on.  Oh well!  I may post more in the future, just for fun.  Happy Halloween!

Wednesday, July 18, 2012

Baby ren faire costume complete!

I was really proud of myself this year. I had a couple projects to make for ren faire and I wasn't sure I was gonna get them all done in time. Hubby and little man gave me lots of help with housework and "me" time so I could get it all done. And I must say, I was really proud of the results!

Me and Little Man
I officially finished my friend's pouch that he wanted for LAST year, but it didn't get done.  Sigh.  I try- I really do.  Then I worked on Little Man's outfit, and it came together quickly and BEAUTIFULLY, much to my surprise.  I must be getting better at this, because his outfit was almost a no-brainer. And last but not least, I made some upgrades to my outfit.  Mostly it was structural improvement as the weight of the dress was creating too much stress on the seams, but I also made myself a French Hood in the early Elizabethan style.  I was hoping to get to Hubby's pants since he had been wearing the pants from his musketeer costume for the last 2 years with his upper class surcoat, and I had hoped to get to making some hose (basically stockings or long socks) for Hubby and my friend, but alas, their legs must show a little longer.  These were not REALLY on my list, but were just an "It would be awesome if I got to it" addition, so I don't feel too bad.  After all, I have to have something to do next year.... :-)

Group Photo

What is the next big thing then?  Well, my friend asked if he could commission me to make him a Fantastic 4 costume for Halloween.  I have the blue stretch material already... Mwaa ha ha...


Update:  I now have these for sale at my Etsy shop here!

Tuesday, July 3, 2012

Baby Ren Faire Costume Continues

A while back I shared some of my research on period appropriate renaissance faire costumes for children, specifically babies. I am really just doing my best guessing here as I am neither a historian nor an anthropologist, so don't come back and say how wrong I am.  This is just what I have been able to gather together, so yeah... Don't hate :-)  Anyway, disclaimers aside, I finally got started last night!  Its only been 4 months since my first post on that.  Sigh, lag time sucks. But I found a pattern I could adapt, and while this is not exactly what I had in my head, its what I can reasonably make in 2 weeks knowing that it will probably be worn twice at the most.  So I made some concessions on fancy-ness and decided to do something a bit more "mini me" since my husband really liked the idea of our son in the same fabric as him.


I had simplicity 5813 from a baptismal outfit I made for our godson, and I figured it would be perfect for adapting to the ren faire vibe.  I am using the dress (A/B) along with the slip which can be seen in the line art - the sleeveless thing, as well as the cap without a brim.  I am using the dress pattern as the gown and the slip pattern as the shift.  Of course, I had to make a lot of changes to make it period appropriate.

For starters, the dress opens in the back, but I wanted a Spanish surcoat sort of look for whatever reason, so I decided to make it open in the front and closed in the back.  This also follows my husband's doublet style, making it match him that much more. I decided to go with loops for the buttons in the front rather than making a placket, again to match my husband's doublet.  I also wanted long sleeves for the gown, but I decided to make them of another fabric and make them detachable since we are having such an awful heat wave here in Wisconsin.  I also cut the front and back of the bodice twice since I am leaving off the collar and need a way to finish the neck and armhole edges.  I will make one cut the facing and the other the fabric.  If this gets too thick, I may find a lighter fabric to line it, but for now, that's the idea.  For the shift, I decided to keep the extravagant length so it could be worn in future years, since our son cannot walk or crawl yet anyway and it is unlikely to bother him much.  It may be a pain to carry him with all that fabric hanging around, but its my own fault!  I also had to add sleeves to this, so I borrowed the sleeve pattern from the sweater and hopefully it will work out okay.  For the hems, I think I may take up some of the excess with the idea that it can be let down later.  I may not since he isn't crawling or walking like I said, but if it seems like WAY too much fabric, I have options at least.

Now for the I hopes.  I HOPE to make the sleeves detachable, but I also hope to make the sides and shoulders adjustable so he can wear this next year.  I am thinking that I will add eyelets to them both and leave a little pleat of slack in the side of the skirt so when cinched up tight you can't tell, but leave that bit of room to make it adjustable in the future.  It will only be adjustable to a point, of course, but it at least gives me the hope that this can be worn more than once!

Well, that is as far as I have gotten as of today, but I will keep you posted on how it turns out!  And I will learn from my mistakes at Easter and have frequent fittings with the model!

my heap of pattern pieces all cut out.  If little man takes a nap, I know what I am doing this afternoon!


Tuesday, March 20, 2012

Baby Ren Faire costume

I know it's only March, but I am SO looking forward to summer.

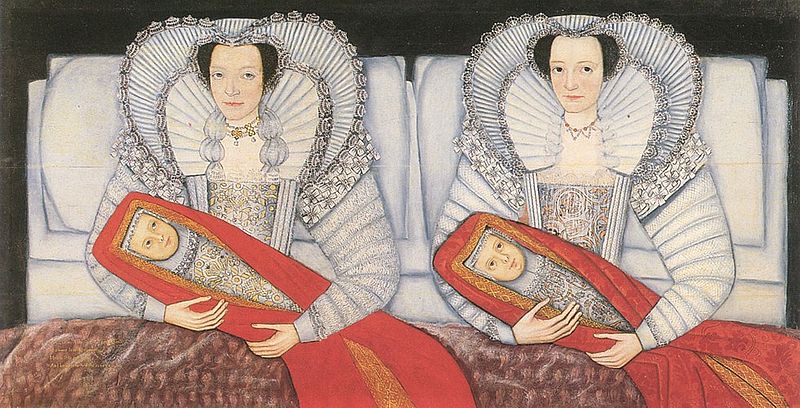
And if you couldn't tell by previous posts, I am obsessed with the Renaissance Faire. This year I have a new attendee, my son! I did the math (ick scary math) and he will be about 8 months at Faire. I went a-researching on the interwebs and guess what I found? Damn near nothing. It took a whole lot of reading and a lot more looking at historical portraits to figure out a viable period costume for him.

I'm still not totally sure what to make, but at least I have an idea.

Here is what I found (forgive my lack of references please):
Up till about 6 months (or even one year according to some) babies were pretty much constantly swaddled to keep them from plucking out their eyes and to promote straight limbs. This was usually done with strips of linen wound around their bodies. Their heads were covered, but it is unclear whether that would be done by the swaddle or by a separate head covering, like a "bonnet" (coif). There are some paintings that show what looks like a solid piece of material used for the swaddle. Some of them were then wrapped with criss crossing bands to hold it in place.


Since little man will be over 6 months, it will be hot, and I don't want to have to unwind a swaddle for each diaper change, this option was out. But it's simplicity can't be argued with!

The next stage of clothing reminds me of a christening gown. The upper classes would dress babies, male and female, in ruffly dresses that often loosely resembled the mother's attire. Middle and lower classes had more simplistic gowns in class appropriate colors for the time. Some images show small children in just an undershirt or chemise, but this was always in the home, not in public, so I think it was a more casual "snapshot" of life, and nothing that would be seen outside. I mean, we've all run nude through the house as toddlers, right?

Yep thats a boy, although this is from 1610 or so.
Finally, I did see some paintings of babies in what can only be called "mini me" outfits. Typically in portraits, these outfits were worn by princes, princesses, and children of other gentry, and often were exact duplicates of what the parents wore. My assumption is that these were special occasion outfits and weren't your typical everyday clothes any more than your modern Christmas outfit resembles play clothes. However, for the queen on progress I don't think it would be a huge stretch that parents would dress children in their very best, but a full corset and hoops on a little girl or a doublet and ruffs on a little boy may not be all that practical by today's standards.

note the littlest one in a "christening gown" type outfit.  The one with the sword is a boy, not yet breeched


So I think I will make my little man a nice gown :). The upside is that it can be used by either gender. Boys didn't get "breeched" until potty training at the very earliest (some not until nearly 10), so if you make it generously sized, it can last 2 faires or more. And what ease of diaper changing! Of all the ridiculous clothing styles of the Elizabethan period, they sure had a smart idea when it came to children!

Stay tuned for more on this. Not only do I need to sketch and mock up a style for him, I have to figure out a way to breast feed in a corset?! Or do I...?

Read more about this project here and here!

Monday, October 31, 2011

Simple Halloween Costume

I'm Pregnant.  About 7 months along now.  Halloween is hands down my favorite holiday.  Unfortunately for me, "Mean Girls" had it right - all Halloween is, for youngish women at least, is an excuse to wear a slutty outfit and some animal ears.  For years, I have not been above that.  I've been a sexy kitty, a playboy bunny, a tiger, catwoman...  And then some non animal things like a sexy vampire, or reusing my ren faire costume.  Don't worry, it was still sexy.  Corsets shove your boobs up. :-)

It looks like I will have to leave the sexy to the other women in the world this year.  I am too round to be classified as "sexy" I think.

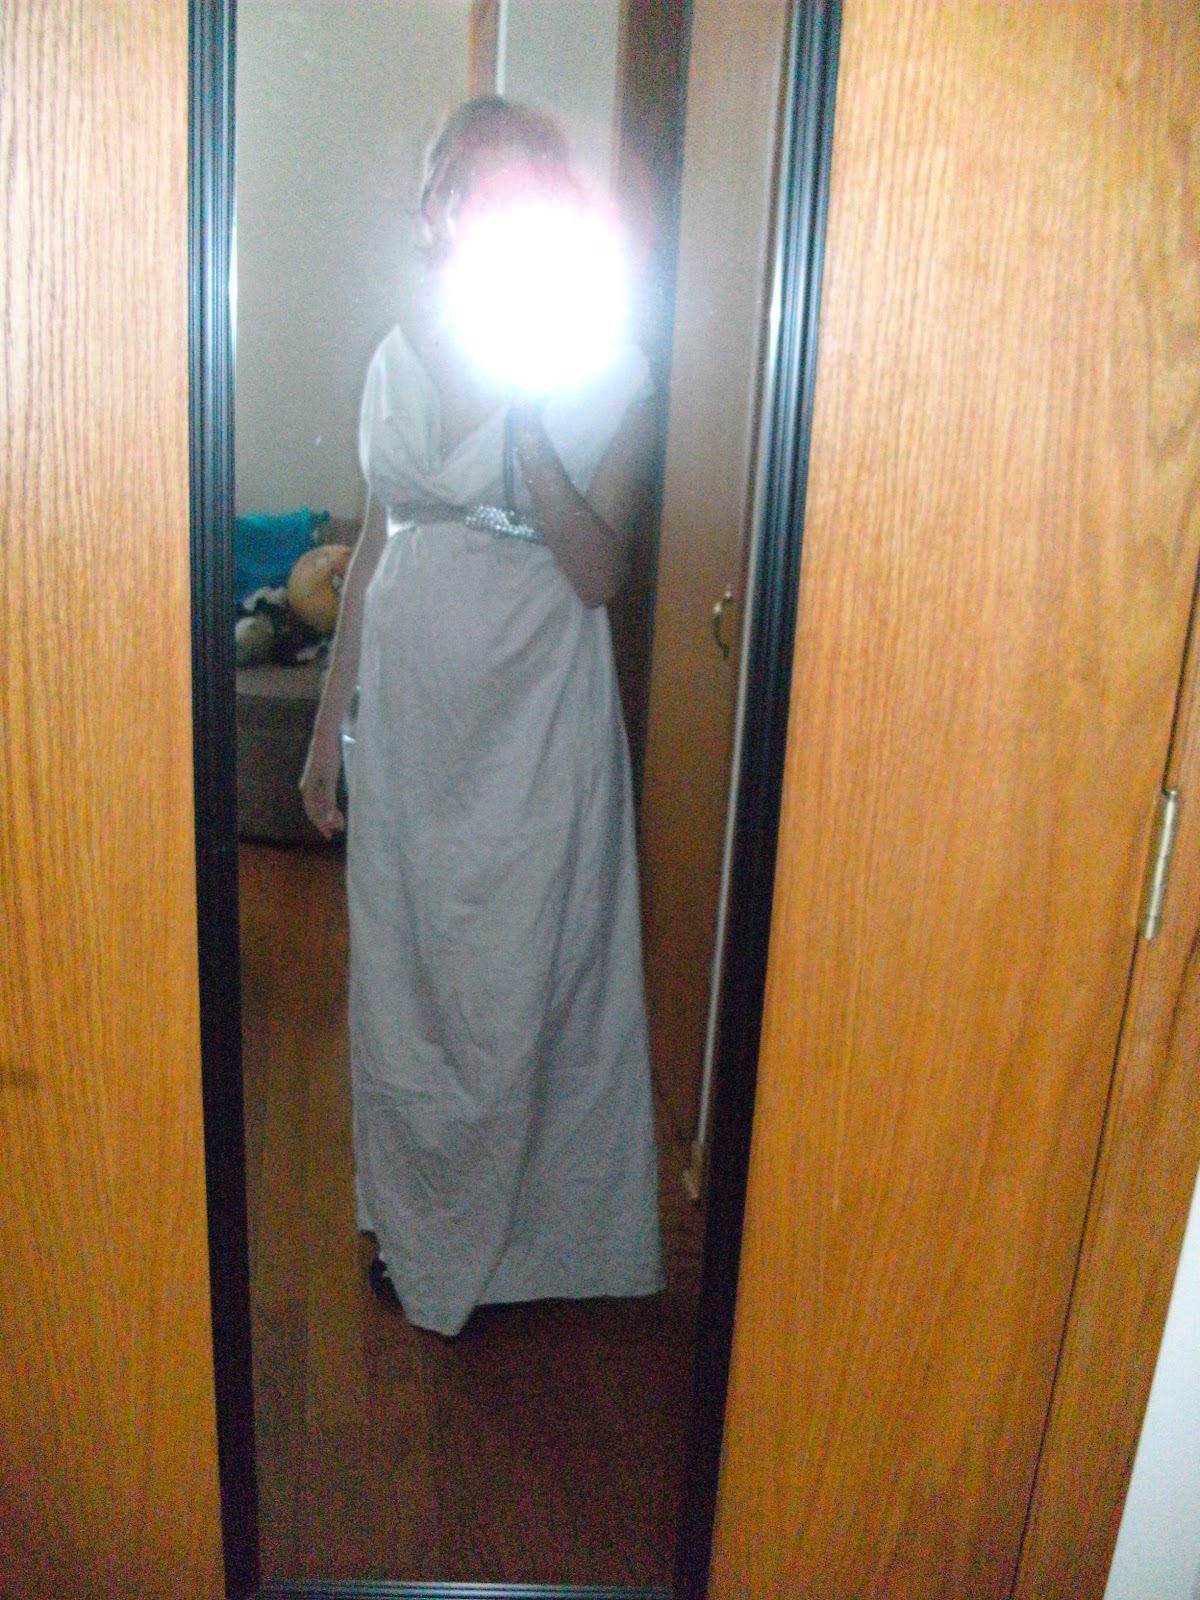
I hate buying commercial costumes because they are so cheaply made and cost so much, but it doesn't matter this year anyway.  There is no such thing as a maternity costume.  Apparently my only option while preggers is to buy a plus sized costume.  Well, my belly may be round, but the rest of me is far from plus size and I doubt that is a viable option for me.  I did scope Target.com for some ideas about what to be, and I found a cute little number that will be empire waisted enough to flow over the curves.  A greek/roman goddess.  Yay for feminine and pretty and still a little sexy!

Since a pattern wont fit me without major modifications, I decided to wing it.  Its a simple enough silhouette, so I should be able to make it work, right?  Feel free to make it short and save on fabric.

Self-Faced Greek/Roman Goddess Dress Costume
You will need:
about 4-5 yards of white cotton fabric, either 45 or 60 inches wide is fine
a belt, pretty sash, chain, or ribbon to cinch the waist
a top (or dress) with a cowl neckline that fits you well
dressmaker's pencil, chalk, or fabric pen with disappearing ink for tracing lines
a good pair of shears - you will be cutting through 4 layers of fabric
sewing machine and thread
serger (optional)

Step 1: Lay out your fabric.  To make your outfit the most symmetrical possible, fold it in half long ways (if you bought it on a standard bolt, you can use the center fold line from that).  Place your top on the fabric.  The midline of the top should match up with the center fold of the fabric.  Leave some extra fabric sticking out above the top for the self facing.  For how much extra to leave, see step 5.

Mine is not centered over the fabric because this is a non maternity top and I needed it to go round the belly!
Step 2:  Trace around the outside of the top.  Leave a seam allowance of about 5/8" while you trace around, except for the top of the neckline which should stay straight across.


Step 3:  Measure how much skirt length you will need.  Measure from where the shirt ends on you to where you want the skirt to end and add just a little bit for a hem.  I made mine floor length and needed to add 35".  Mark the length and use a straight edge to draw a line across the whole width of the fabric.


Step 4:  Now you get to freehand the silhouette of the skirt.  Connect the line from tracing the top to the hemline.  Depending on how full you want the skirt and how wide your fabric is, you may want to run it all the way out to the selvage edge, but you may want to make it a little more tapered, depending on your preference.  I ran mine out all the way to the selvage edge.  I also didn't follow the line of the top very well since it doesn't actually fit me, but you get the idea.

Step 5:  Now that you have your outline drawn, you are ready to cut!  To create the self facing top, you will need to fold under the top edge of the fabric at the neckline so you are cutting an extra layer.  This actually means that you are cutting through 4 layers of fabric since it is already folded in half.  Make sure there is enough overlap to reach just below the armhole edges.


Cut along your traced lines.
 When you open out the facing, it will look like this:

Step 6:  Use your cutout as a template for the back of the dress.  I made mine a lot narrower since I am pregnant and it saves on fabric not to have so much extra width, but you can just reuse the same shape.  Cut an exact replica on the fold again so you have 2 of the same piece.

Step 7:  Now we get to the sewing part!  Unfold the two pieces.  Finish the top edge of the facing for both.  Either run it through a serger or create a narrow hem so the edge does not fray.  It doesn't have to be beautiful as it will be turned to the inside, but you don't want the facing falling apart.

Step 8:  With right sides together, fold the facing toward the dress along the neck edge.  Pin the facing and the dress together along the armhole edges.  Stitch the armhole edges together at the 5/8" seam allowance.  Stitch again, close to the stitching inside the seam allowance and trim the seam.  Repeat for both sides and for front and back.  Turn the facing right side out.

I pinned the extra down the side, but do not stitch there.  Only stitch the curved armhole edge!
double stitch to reinforce and then trim so you can turn the facing in.  If it still wont turn, clip the curve.

Step 9: Along the shoulder seams there will now be a kind of "pocket".  To stitch the shoulder seams, you will have to fold the seam allowance of the back piece into the pocket and slip the seam allowance of the front piece into the opening.  Make sure the shoulder widths of the two pieces are even by sliding the pieces together or apart as needed, then top stitch them together.  Repeat for both sides.


Edges are not yet even, slide them around until they match up!


Step 10:  Match up front and back side seams of dress and stitch along seam allowance from armhole edge to hem.  Make sure you catch the piece of facing that overlaps and stitch that along with the side seams to hold it down.

Step 11: Try on dress. If needed, trim the hem a little so it falls where you want it to fall, and to make it even.  The hem may not be perfectly straight since we did not curve the lower edge, but it should be close enough. If it really bugs you, feel free to tinker! :-)  Hem the lower edge and you are done!

Step 12:  Put dress on and use the belt or ribbon or whatever to tie around your waist or just under the bust for an empire waist.  Adjust the fullness of the neckline to suit you and admire your hard work!


Bottom Line:
5 yards fabric at $2/yd = $10 (Use muslin or bargain bin fabric for this!  I used some stash fabric I have had since 2005.  No cost to me! YAY!)
Total cost: $10
Total time: about 3 hours, including figuring out how to cut and assemble.  Should be less for you!

My neckline was a little too loose when I bent over, but I don't think hubby minded looking down my dress all day.  My armholes were a little snug, too, so I went back and made them a little larger.  If you don't have a cowl neck top to copy, just make a straight line across the top and try using the armhole outline from another sleeveless top.  Copy the general shape of my layout and you should be okay.  This isn't high fashion quality sewing... its meant to be an alternative to a bedsheet with eyes cut out!

A few general notes: the self facing may seem like a pain to cut and sew, but it will prevent you from having to bind all your edges, which I absolutely hate doing, as well as allow for a second layer of fabric along the bust which adds to modesty.  You choose which you prefer and roll with it.  If you are tracing a stretchy top, beware!  If it has to stretch to fit you, leave some extra in there otherwise the non stretchy cotton will not fit! Also, whcn choosing fabric, don't pick something so cheap that it is see thru!  Good Luck!

Happy Halloween!


Monday, August 22, 2011

No time to Blog...

Edited 8/23: Added 2 photos hooray!

So ren faire was this weekend.  Whoa.  I was sooo busy I didn't even have time to write about how busy I was. But everything (almost) got done.  I decided not to make a vest for my nephew as he is sensitive to heat and probably wouldn't want to wear it anyway.  I also forgot to make him a sash and when I remembered it was too late; I didn't have the right color fabric anyway.  I didn't make hubby a new pair of pants as his old ones worked fine still.  I also didn't get around to making myself anything to wear.  Oh well.  But everything else turned out fabulously.  All in all, I made 3 shirts from 3 different patterns, a vest of my own design, a pair of shorts of my own design, a very difficult pair of breeches, and my hubby's infamous doublet.  I was up till 12:30 on Friday night/Saturday morning sewing on buttons and up at 6:30 Saturday to make the buttonholes via the sewing machine and to pound a few last minute eyelets and thread some ribbons through casings, but all in all, it wasn't as last minute as I have been in the past!  I wasn't hemming all the way to the state line! :-)  I consider that a major victory.

As for photos.  Well.... I kind of forgot my camera.  I only have 1 costume here, and that is hubby's.  I do have a friend who has photos of his outfit, but nothing of my nephew's.  So I will post them when I get them.  Sigh.  All that work and no proof!  Seems like that is always how it works out.

Hubby is on the far left (looking rumpled at the end of the day) and Warrior man is middle right.  Didn't make the other 2.
Better shot of warrior man... playing up the camera as always!


Tonight I am trying my hand at homemade pasta.  I have long made fettuccine alfredo SAUCE from scratch (insanely fast and easy, btw) but I haven't tried the pasta part till now - weddings get you all kinds of kitchen gizmos you want but can't bring yourself to buy for your own kitchen.  Hopefully I will not develop carpal tunnel from kneading dough.  I hear it is a bear. :-)

Monday, August 8, 2011

Shirt complete, only a crapload o' stuff to go

So I warned you - ren faire stuff may leak into my baby wrap timeline.  True to form, here is some ren faire update stuff. :-)  At the end I promise to give a quick update to baby things... its like the news at 11:00.  all you want to hear is in the last five mins.  Lucky for you, scroll bars were invented!

So, I am making an italian nobleman's costume for my husband for ren faire.  We are going with a group (hopefully - very few people RSVPed...) and as usual, I am the one making costumes at the last second.  Oh what WOULD I do without procrastination?  I promised my husband a new costume last year since I made myself a court dress (read: fancy) and his musketeer costume, although cute when there were 3 of them, is not only from a totally different CENTURY, but is also no longer coordinating with mine.  At all... So, I told him I would make him a court costume.  Well that wasn't a big deal until I wound up preggers and now cannot wear my court dress.  Copious amounts of boning and pregnancy do not mix.  Now I have to make myself a court dress that will accommodate my big belly as well as make him a fancy over the top outfit.  They take SO much longer than peasant garb, what with all the pieces, trims, frilly details and whatnots.  Oh, did I mention I promised my nephew a pirate costume?  Or my friend chuck a vagabond/ruffian type outfit LAST year that I did not deliver on?  Oops...

So, here we are, 2 weeks out and I have (drum roll please) - One shirt complete.

Uh oh.

Lucky for me I have most of the notions and fabrics and such that I need.  So now, just all the hard work lol.  I have washed more loads of laundry than imaginable to prep the fabric for cutting.  (random tip: always wash/dry your fabric the way you will wash/dry the finished garment so you don't end up with weird shrinkage.  Most fabrics shrink more along one axis than the other which makes for a lovely distorted item if you skip this step)  I wanted to hang dry most of it - try finding a place to hang dry 8 yards of fabric.  yikes!

Anyway, I have the doublet main fabric and interfacing cut as of last night, but have yet to cut the lining.  My sewing fingers are itching to get started, but I must have all the pieces cut first - new personal rule.  It keeps me from cutting corners later in my eagerness to finish something.
So, now to go finish cutting the lining, then to piece the darn thing together.  I also broke a cardinal rule for this (one I frequently break) - I made no muslin (test garment) and then I cut into really expensive fabric.  Fingers crossed everyone!

So all I have left is:
A hat for DH
New pants for DH if I have time
Shirt for nephew
Pants for nephew
vest or coat for nephew
Shirt for chuck (my friend)
Vest for chuck
Sash for chuck (easy yay!)
Pants for chuck
Dress for me? (time permitting)

That is so daunting... I need a nap....

Coming soon: finished Doublet?

Ack!  I almost forgot!  My promised update on baby wrap stuff! I purchased fabric at walmart the other day - I usually don't because the coupons from Joann's and Hancock are so awesome, but I was already there and I wanted to play around with some things.  Go instant gratification.  I did end up getting some quilters cotton - two prints for each style so it can be reversible.  I liked the geometric stuff but then I found jungle themed stuff which is our theme so I had to buy it and its coordinate, too (I also plan to do some nursery stuff with it so I got extra :-)).
I also got some woven gauze (left) for the airy one and a single stretch knit (very very mild stretch - right) for a stretchier version.  Since they seem easy to make, I may try to whip one up this week still.  We shall see.